Desserts

Make Valentine’s Day Extra Sweet

Valentines Day can often feel like a forced day to be happy and in love. For me, it’s a time to remember those I love. Sometimes I celebrate with just my husband and other times I invite friends into the fold to have a delicious meal and stimulating conversation. Even those that are having a hard time can’t help but relax and enjoy when this dessert is served. And it is truly Seriously Simple to prepare.

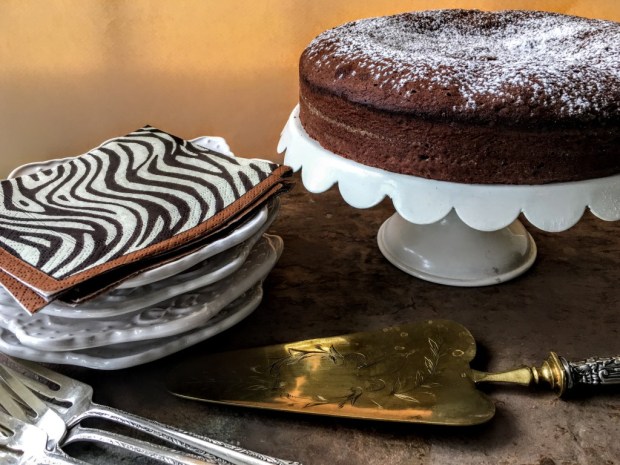
I have made many a chocolate cake, each that have their own special attributes— Ones that have multi-layers with different buttercreams, ones with ground nuts instead of flour, ones covered with chocolate ganache and then there is this one. The rich chocolatey batter is embedded with chunks of caramel that soften and melt slightly as the cake bakes. A light sprinkle of sea salt adds an even richer taste sensation. If you make this ahead just make sure to warm it before serving. Don’t worry if you have leftovers. Just freeze, defrost and enjoy for another meal.

Kudos and thanks go to well-respected cookbook author and blogger Betty Rosbottom who concocted this heavenly combination. I found this recipe on her website and contacted her (bettyrosbottom.com) to see if I could share it with my readers. She happily agreed. When I asked how she developed this recipe she explained that she tasted something like this while in Paris and then set out to recreate it for her readers. I’ve adapted it and hope you love it as much as I do. Make sure you look for good quality dark chocolate. If you can find hand made caramels the cake will be that much better. And remember this cake is great for any happy occasion!

Dark Chocolate and Caramel Cake

Serves 8

7 ounces unsalted butter, at room temperature

½ pound bittersweet chocolate chips or bars, cut into small pieces (I like Ghiradelli 60%)

4 large eggs

½ cup fine sugar

¾ cup sifted flour

1/2 teaspoon baking powder

½ teaspoon Fleur de Sel or sea salt

8 caramels, like Kraft’s, cut in half

Powdered sugar

1 quart best quality vanilla ice cream

  1. Preheat the oven to 350F.Butter and flour an 8-inch springform pan. Line the bottom with a round of parchment paper.
  1. In a Pyrex measuring cup or other glass bowl combine the butter and chocolate and cook until the chocolate and butter are melted; about a minute and a half. Check after 30 seconds and using a rubber spatula blend together. Remove and cool.
  1. Meanwhile combine the eggs and sugar in an electric mixer and on medium-high speed mix for about 3 minutes, or until the mixture lightens in color and thickens slightly. Reduce the speed to medium and add the chocolate-butter mixture. Then add the flour, baking powder and salt and carefully incorporate until blended. Transfer the mixture into the prepared springform pan. Use a rubber spatula to even out the top.
  1. Push the caramel pieces into the batter carefully so they are equally placed. Use the spatula to smooth the top. Bake for 22 to 28 minutes or until a wooden skewer comes out clean from the center. Cool the cake on a cooking wire rack for at least 20 minutes. Run knife around the inside edge to avoid sticking. Once cool release the sides.
  1. To serve: Using a sharp knife remove the bottom springform from the cake and discard the parchment paper. Transfer onto a serving platter, decorate with powdered sugar, slice into wedges and serve with a scoop of vanilla ice cream, if desired.

Advance Preparation: This can be made through step 4, cooled completely and covered with plastic wrap and then foil and refrigerated up to 2 days ahead. It can also be frozen and defrosted. To reheat, remove foil and plastic wrap and bring cake to room temperature. Reheat in a 350F oven for 10 minutes.

Caramelized Banana Foster Bread: Coffee Cake or Dessert

bananas-foster-banana-bread-main

When the book Foster’s Market Favorites landed on my desk I was in heaven. Exquisite photography coupled with time-tested comfort dishes are highlighted from her amazing market in Chapel Hill, North Carolina. The introduction written by her husband tells her story— from her roots in Tennessee to finally settling in North Carolina where she and her market have become a culinary institution.


This book is a collection of Sara Foster’s recipes from areas of her past—Chicken Salad from Soho Charcuterie, NYC, Says Bread Pudding from her early Market days and a plethora of Southern dishes like Pecan Sweet Potato Sticky Buns and Foster’s Pimento Cheese. I couldn’t get enough of the photos which truly made me hungry when I had just finished lunch! Kudos to photographer Peter Frank Edwards.


I settled on testing this recipe after looking at the picture. One word for you—YUM! Easy to put together, this recipe has made it into my Seriously Simple fallback recipe file. I did a bit of tweaking the recipe by slicing the banana that is caramelized rather than keeping it halved. I also used rum instead of bourbon to switch it up. It was hard to let the bread cool because I wanted to dive into it as it sat on a rack resting. I served it for dessert with vanilla ice cream to raves at a casual dinner party and the next day as a coffee cake. Either way, this clever take on Bananas Foster from New Orleans will leave your guests asking for more.


Foster’s Caramelized Banana Foster Bread


½ cup light brown sugar

5 ripe bananas

2 tablespoons bourbon or rum

2 ¼ cups all-purpose flour

2 teaspoons baking powder

1 teaspoon ground cinnamon

½ teaspoon freshly grated nutmeg

½ teaspoon ground cardamom

¼ teaspoon salt

8 tablespoons (1 stick) unsalted butter, softened

1 cup sugar

2 large eggs

½ cup chopped pecans

1 teaspoon pure vanilla extract


1.Preheat the oven to 350°F. Grease and lightly flour a 9 x 5 x 3-inch loaf pan.


2.Spread the brown sugar evenly on the bottom of a cast -iron skillet over medium heat. Peel and slice 1 of the bananas into ½-inch slices and place on the sugar. Sprinkle the bourbon (or rum) over the top and cook, shaking the pan occasionally until the sugar melts and the banana begins to caramelize, about 3 minutes. Turn the slices over and continue cooking and caramelizing, about 2 to 3 more minutes, or until all slices are nicely caramelized. Remove from the heat and set aside until ready to use.


3.Combine the flour, baking powder, cinnamon, nutmeg, cardamom and salt in a large bowl and stir to mix.


4.In a separate bowl, with an electric mixer beat together the butter and sugar until soft and creamy, stopping to scrape down the sides of the bowl several times. Slowly add the eggs, one at a time, mixing well after each addition. Slice and add the remaining 4 bananas, pecans and vanilla, mixing to break up the bananas and combine.


5.By hand, stir the flour mixture into the banana mixture just until the dry ingredients are incorporated, being careful not to overmix. Pour the batter into the prepared pan and place on a rimmed baking sheet (this makes it easier to handle in and out of the oven).


6.Arrangethe caramelized banana slices evenly on top of the loaf and drizzle with any remaining caramel. Bake 1 hour to 1 hour and 10 minutes, until the bread rises and a wooden skewer comes out clean when inserted in the center.


7.Remove from the oven and let sit to cool, about 15 minutes. Run a knife around the inside edge of the pan, turn the loaf out onto a cooling rack and continue to cool more before slicing and serving, about 10 minutes.


bananas-foster-banana-bread-main.jpg


Peach Crostata: Easy as Pie

Easy as Pie Peach Crostata

Easy as Pie Peach Crostata

When I am in a pinch for time but want something special for dessert I often fall back on preparing a crostata. Sometimes called a galette in French cooking, this free-form tart has endless variations. A crostata is made by rolling out pastry dough into a large round. The fruit is placed in the center of the pastry and the dough is pulled up around the fruit and folded over to create a rustic looking tart, rather than a perfect-looking formal fruit tart. This couldn’t be easier.


The unassuming appearance is a good thing. Even my friends who fear pastry making have great success with this recipe because it doesn’t have to be picture perfect. The rough country look also expands the opportunity for variation. I have seen versions that feature thick raspberry jam, fresh pitted cherries, apricots and nectarines, blueberries and raspberries to name a few. Depending upon the sweetness of the fruit you select you may need to adjust the amount of sugar you add.


Make sure to roll out the pastry dough to a large 13-inch circle. I keep extra flour on the pastry slab and rolling pin to keep the dough from sticking. The dough can be immediately rolled out and doesn’t need to rest because I use frozen butter that keeps the dough sufficiently chilled. I also use white pastry flour that has a lower gluten content and does not need to rest. If you are using all-purpose flour you can chill it for a half hour before rolling out.


In this crowd-pleasing dessert, the skin is deliberately left on the peaches for a rustic texture. Nectarines can be substituted for the peaches if you like. I like to serve this warm so I will bake it an hour or two before serving. Don’t forget a scoop of French vanilla ice cream.


Peach Crostata

Serves 6


Crust

1 1/4 cups white unbleached pastry flour or all-purpose flour

1/4 teaspoon salt

1 teaspoon sugar

8 tablespoons (1 stick) frozen, unsalted butter, cut into 1/2-inch pieces

1/4 cup ice water


Filling

5 tablespoons sugar, divided

2 tablespoons all-purpose flour, divided

6 medium or 4 large peaches, pitted and cut into 1/2-inch pieces


1 pint French vanilla or berry ice cream (optional)


  1. Prepare the pastry: Place the flour, salt and sugar in a food processor fitted with a metal blade and process for about 5 seconds. Add the butter and a few tablespoons of water and process until you have a crumb-like texture, about 5-10 seconds. Pat the dough into a round form for easy rolling. If using pastry flour continue immediately. If using all-purpose flour, refrigerate, covered for half hour.
  2. Place a 10-inch diameter removable bottom disc of a springform or removable tart pan on a heavy baking sheet with a rim that is lined with parchment paper. (You won’t need the sides of the springform or tart pan for this freeform tart.)
  3. On a floured surface roll out the pastry into a round 13 inches in diameter. Roll the pastry back onto the rolling pin and transfer it to the tart bottom round, laying the dough flat to cover the round with a 3 inch border overlap all around on the baking sheet. Refrigerate while making the filling.
  4. Preheat the oven to 400F. In a medium mixing bowl, combine 1 tablespoon sugar, 1 tablespoon flour and the peaches. Remove the tart from the refrigerator and sprinkle 2 tablespoons sugar and 1 tablespoon flour evenly over the center of the crust. Arrange the fruit mixture in the center of the pastry and then fold about 3 inches of the pastry edges up around the fruit, making pleats, to look like a free-form tart. Use your thumb and forefinger to make the pleats in the pastry.
  5. Brush the pastry with water and evenly sprinkle the remaining 2 tablespoons sugar over the pastry and fruit.
  6. Bake the tart for 40-45 minutes or until the fruit filling is bubbling and the crust is caramelized. Let cool at least 20 minutes on a wire rack. Slide the tart pan bottom to a serving platter. Slice and serve with ice cream.

Advance Preparation: Can be made up to 8 hours ahead and kept at room temperature. Serve room temperature or reheat in the a 325F oven for 10 to 15 minutes.


Easy as Fourth of July Ice Cream Sundae Pie

Easy as Pie Ice Cream Pie

Easy as Pie Ice Cream Pie

Desserts can be tricky for a Seriously Simple cook, especially as the temperature goes up. Making pie dough or baking a fancy cake isn’t what I have in mind in the heat of the season. Quick and easy to put together, this ice cream pie answers the call for a decadent, delicious and very easy to-put-together dessert. Since you are buying the crust, insert the pre-made crust in the foil into a glass or porcelain pie plate. This will make a pretty presentation

Softened strawberry and vanilla ice cream is spooned into the crust in layers. Then a simple decoration can be added by lining the outside of the pie with alternating raspberries and blueberries. Best of all, this can be prepared up to 2 weeks ahead, covered tightly, and frozen. Instead of a chocolate sauce warm blueberry compote is spooned over the pie slice just before serving. It’s a knockout Fourth of July dessert that will leave your guests asking for the recipe. It’s fun to stop by the party store and pick up Patriotic decorations that really make the pie stand out.

This is so easy to make and can involve children as well. Kids can help decorate the finished frozen dessert. For other occasions you can vary the ice cream if you like. Just remember that the crust is either graham cracker or chocolate and go from there. A few of my favorite flavors include Cookie Dough, Oreo, Coffee, Salted Caramel and English Toffee. Make sure the ice cream is soft enough to work with but is not already melting; remove the ice cream from the freezer for 20 minutes before working with it.

No matter what flavors you choose, you really can’t go wrong. So make time this summer to create your own signature ice cream pie. This is a great item to keep in your freezer. Remember to remove the pie from the freezer 15 minutes before serving for easy slicing; dip a knife in hot water for ease in cutting. Happy Fourth!


Fourth Of July Ice Cream Sundae Pie with Blueberry Sauce


Serves 6 to 8


For Pie

1 pint vanilla ice cream, slightly softened

1 pint strawberry ice cream, slightly softened

  • (9-inch) purchased graham cracker or chocolate piecrust

1 pint raspberries

1 pint blueberries


Decorations like mini-flags and/or red, white and blue sprinkles


For Sauce

4 (6-ounce) containers blueberries

2 tablespoons water

1 tablespoon brown sugar


  1. Spoon ice cream into crust (if doing two different ice creams, spread one on top of the other); smooth top. Decorate the pie by alternating raspberries and blueberries around the outside rim. Freeze until firm.


  1. To make the sauce bring berries, water, and brown sugar to simmer in medium saucepan over medium-high heat. Cook until sauce thickens, stirring gently, about 4 minutes; remove from heat.


  1. To serve: remove pie from freezer 15 minutes before serving and decorate with Fourth of July sprinkles or other decorations.


  1. Cut pie into wedges; place on plates. Spoon warm sauce over and serve immediately.


Summer Fruit Crisp

dt.common.streams.StreamServer (5)

Ingredients

  • 3 cups raspberries or blueberries (two 6-ounce packages), or 1 package of each, cleaned and picked over
  • 3 medium white or yellow peaches or nectarines, pitted and cut into 2-inch dice
  • 12 cup flour
  • 14 cup sugar

For the custard:

  • 2 eggs
  • 1 cup creme fraiche
  • 1 teaspoon vanilla extract
  • 1 tablespoon flour

For the topping:

  • 6 tablespoons brown sugar
  • 1 cup flour
  • 12 teaspoon salt
  • 1 teaspoon finely chopped lemon zest
  • 1 teaspoon vanilla extract
  • 12 cup (1 stick) melted unsalted butter

Instructions

  1. Heat the oven to 375 degrees. In a medium bowl mix together the fruit, 12 cup flour and 14 sugar until well the fruit is well coated. Transfer to an 8-inch by 10-inch or a 9-inch by 12-inch greased gratin pan or baking dish. Press down on the mixture with a spatula to make an even layer with no gaps. Place on a baking sheet.
  2. To make the custard: In a medium bowl, with a whisk, beat the eggs well. Add the creme fraiche and vanilla, and whisk until blended. Sift in the flour, whisking well to make sure the custard is smooth and no lumps remain.
  3. To make the topping: In a mixing bowl, combine the brown sugar, 1 cup flour, salt and lemon zest, and mix together. Add the vanilla and melted butter and mix until a soft dough forms.
  4. Spread an even layer of the custard mixture over the fruit. With your fingers, evenly crumble the topping over the fruit. Bake for 35 to 45 minutes or until the top is golden brown and completely cooked through. Serve immediately. You can serve this at room temperature.

Advance Preparation

This may be prepared 8 hours ahead, covered and kept at room temperature before serving. Heat in a 375-degree oven for 10 minutes before serving.

Tips

Don’t bother peeling the peaches or nectarines. Slice them in half and then scoop out the pit with a spoon. Cut into pieces. Try this same recipe using plums or nectarines instead of the peaches and blackberries instead of the raspberries.

Serves 6 to 8.

Rhubarb and Strawberry Crostata

Ingredients

  • Pastry dough (recipe can be found here)
  • ¼ cup sugar
  • 2 tablespoons all-purpose flour
  • ½ pound rhubarb, peeled and cut into 1/4-inch slices
  • 1 pint strawberries, hulled and cut into 1/2-inch pieces
  • 1 teaspoon grated lemon zest
  • 1 teaspoon minced peeled fresh ginger
  • 3 tablespoons sugar
  • 1 tablespoon all-purpose flour

Instructions

  1. Place a 10-inch diameter removable bottom disc of a springform or removable tart pan on a heavy baking sheet with a rim so that the pan catches the juices. (This is sometimes called a jellyroll pan) On a floured surface, roll out the pastry into a 13 inch-round in diameter. Roll the pastry back onto the rolling pin and transfer it to the tart pan bottom, laying the dough flat to cover the bottom with a 3 inch border overlap, overhanging its edge. Refrigerate while making the filling. Preheat the oven to 400F.
  2. For the filling, in a medium mixing bowl, combine sugar, flour, rhubarb, strawberries, lemon zest and ginger.  Remove the tart from the refrigerator and sprinkle 2 tablespoons sugar and 1 tablespoon flour evenly over the center of the crust.  Arrange the fruit mixture in the center of the pastry and then fold about 3 inches of the pastry edges up around the fruit, making pleats, to look like a free-form tart.  Brush the pastry with water and evenly sprinkle the remaining 1 tablespoon sugar over the pastry and fruit.
  3. Bake the tart for 40-45 minutes or until the fruit filling is bubbling and the crust is nicely browned. Let cool at least 20 minutes on a wire rack.  Transfer the tart, still on the pan bottom, to a serving platter.  Slice and serve with ice cream, if desired.

Video instructions on how to make this recipe can be found here.

Serves 6 people.

Lemon-Lime Pound Cake

Instructions

Cake:

  • 1/2 cup unsalted butter, room temperature, plus more for greasing pan
  • 1 cup cake flour, plus more for greasing pan
  • 1/2 teaspoon baking powder
  • Pinch salt
  • 1 cup granulated sugar
  • 3 large eggs
  • 1 teaspoon vanilla
  • 1 tablespoon finely chopped lime zest
  • 1 tablespoon finely chopped lemon zest
  • 2 tablespoons milk
  • 2 tablespoons lemon juice

Glaze:

  • 1/2 cup confectioners’ sugar
  • 2 tablespoons lime juice
  • Fresh fruit salad or berries, for serving
  • Store-bought lemon curd, for serving

Instructions

  1. Heat the oven to 325 degrees. Grease a 9- by 5-inch loaf pan with butter and dust it with flour. Combine the 1 cup cake flour, baking powder and salt in a medium-size bowl.
  2. With an electric mixer on medium speed or in a food processor fitted with a metal blade, beat the 1/2 cup butter until softened. Slowly add the sugar and beat the mixture until it is light, thick and lemon-colored. Add the eggs, vanilla and lime and lemon zest, and beat until incorporated. Slowly add the flour mixture, alternating with the milk and lemon juice until just incorporated.
  3. Pour the batter into the pan and bake for 45 minutes or until a wooden skewer comes out clean and the top is nicely browned. Cool for 10 minutes and then invert onto a cake rack that has been placed on top of waxed paper.
  4. While the cake is baking, prepare the glaze: In a medium-size bowl, combine the confectioners’ sugar and lime juice, and mix until the sugar has dissolved and the glaze is smooth with no sugar lumps.
  5. Spoon the glaze over the cake in a pretty pattern. Place on a serving plate. Serve with a bowl of your favorite berries or fresh fruit and lemon curd, if desired.

Advance preparation

This can be made a day ahead, covered well and kept at room temperature.

Makes 6 servings.

Peach Melba Crisp

Instructions

  • Butter or shortening, for greasing the pan
  • 3 cups raspberries, cleaned and picked over
  • 3 medium-size peaches, pitted and cut into 2-inch dice
  • 1 1/2 cups all-purpose flour, divided
  • 1/4 cup granulated sugar
  • 1 cup crème fraîche, store-bought or homemade
  • 6 tablespoons brown sugar
  • 1/2 teaspoon salt
  • 1 teaspoon finely chopped lemon zest
  • 1 teaspoon pure vanilla extract
  • 1/2 cup melted unsalted butter

Instructions

  1. Heat the oven to 375 degrees. Grease a 10-inch by 8-inch or 12-inch by 9-inch baking dish or gratin pan.
  2. In a mixing bowl, mix together the fruit, 1/2 cup flour and the granulated sugar until the fruit is well coated. Transfer to the pan.
  3. Evenly spread the crème fraîche over the fruit mixture using a rubber spatula.
  4. In a mixing bowl, combine the brown sugar, salt, lemon zest and 1 cup flour and mix together. Add the vanilla and melted butter and mix until it becomes soft dough.
  5. Crumble the mixture with your fingers evenly over the fruit. Bake for 35-45 minutes or until the top is golden brown and completely cooked through. The dish can be prepared 8 hours ahead, covered and kept at room temperature before serving. Reheat in a 375 degree oven for 10 minutes before serving, or serve at room temperature.

Makes 6-8 servings.


Limoncello Zabaglione with Fresh Berries

bilde (1)

Ingredients

  • 6 large egg yolks
  • 3 tablespoons sugar
  • 13 cup Limoncello
  • 1 tablespoon crème fraîche or sour cream
  • 3 pints favorite berries, such as blueberries, raspberries, blackberries or strawberries, hulled and thinly sliced
  • Fresh mint sprigs to garnish

Instructions

  1. In the top of a medium-size double boiler, combine the egg yolks, sugar and Limoncello and whisk until well blended.
  2. Place the double boiler over medium heat and whisk the mixture vigorously until it becomes foamy and begins to thicken. Remove the mixture from the heat and let cool for 10 minutes. Add the cream and whisk until incorporated. The consistency should be thick and custard-like and should be able to coat a spoon.
  3. Place the berries into individual small serving bowls (wine goblets look pretty).
  4. To serve, pour the zabaglione over the berries evenly, garnish with mint, and serve immediately.

Advance preparation 

You can serve the zabaglione chilled and prepare it up to 6 hours ahead. Cover and refrigerate, and make sure to whisk it right before serving.

Tips

If you enjoy this dessert, consider swapping out the Marsala for other liqueurs like Grand Marnier, Amaretto or Frangelico. I like to garnish the dessert with a flavor from the nut liqueurs, if possible, so toss on a few toasted almonds or hazelnuts, if you like. I usually serve a plate of almond or butter cookies to accompany.

Makes about 1 ¼ cups; serves 6 people as a topping.

Glazed Lemon Sour Cream Cake

Ingredients

  • 1 3/4 cups all-purpose flour
  • 1 teaspoon baking soda
  • 1 teaspoon baking powder
  • 1 cup unsalted butter at room temperature
  • 1 cup sugar
  • 3 large eggs at room temperature
  • 1 tablespoon minced lemon zest
  • 2 teaspoons lemon extract
  • 1 cup sour cream Glaze
  • 1 1/2 cups powdered sugar
  • 1/2 cup strained fresh lemon juice
  • 2 teaspoons finely chopped lemon zest

Instructions

  1. Grease and flour a 9-inch lightweight Bundt pan. Preheat the oven to 350°F. Sift the flour, baking soda, and baking powder together in a medium mixing bowl. Set aside.
  2. In a medium bowl with an electric mixer on medium speed or in a food processor fitted with the metal blade, beat the butter and sugar together until light and fluffy, about 4 minutes. Beat in the eggs, zest and lemon extract and mix for 2 more minutes.
  3. Reduce the mixer to the lowest speed, add half the flour mixture, and mix until well combined. Add half the sour cream, mixing constantly, and then add the rest of the flour and sour cream, ending with the sour cream.
  4. Pour the mixture into the prepared Bundt pan and bake for about 35 to 40 minutes or until a cake tester inserted in the center comes out clean. Cool in the pan for 30 minutes, then invert onto a cake rack.
  5. Make the glaze: Using a wire strainer, sift the powdered sugar into a small nonaluminum bowl. Add the juice and lemon zest and whisk to break up any lumps.
  6. Place the cake and the rack on a wax paper-lined rimmed baking sheet. Using a long skewer, poke holes in the cake almost going through the bottom at 1-inch intervals. Slowly pour the glaze over the cake, making sure that it’s absorbed as you pour. Let the cake come to room temperature. This can be prepared up to 3 days ahead and kept at room temperature, tightly covered. The cake can also be tightly wrapped and frozen in aluminum foil up to 2 months.

Tips

Check out Quick Bundt Cake Tips here.

Serves 8 to 10 people.