Blog

A Taste of Georgia in a Dish: Mashed Sweet Potatoes with Peach Preserves and Toasted Pecans

Recently I attended the Chef’s Pecan Culinary Summit in Atlanta along with other chefs from around the country. Pecans were discovered in central and eastern North America in the 1600’s and have flourished ever since. They have been an important commodity for trade. We learned why pecans are a versatile nut that is not only delicious but also nutritious.


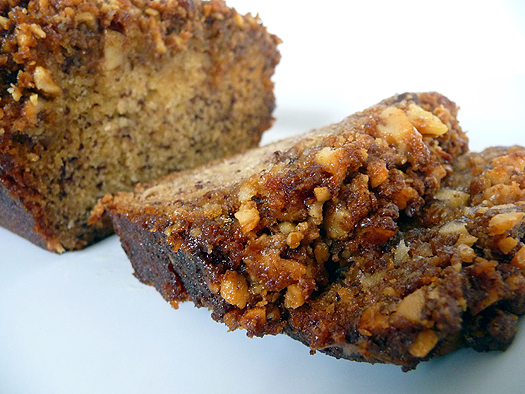
Pecans are heart healthy and are packed with 19 vitamins and minerals along with fiber, protein and are sodium-free. I learned how versatile the creamy, toasty pecan could be as we cooked dishes that added the chopped pecans to meatballs, pizza crust, and filling for tacos. We also stuffed them in pitted dates, wrapped in bacon and roasted til crisp. All of these unusual applications were happily surprising and plenty tasty.


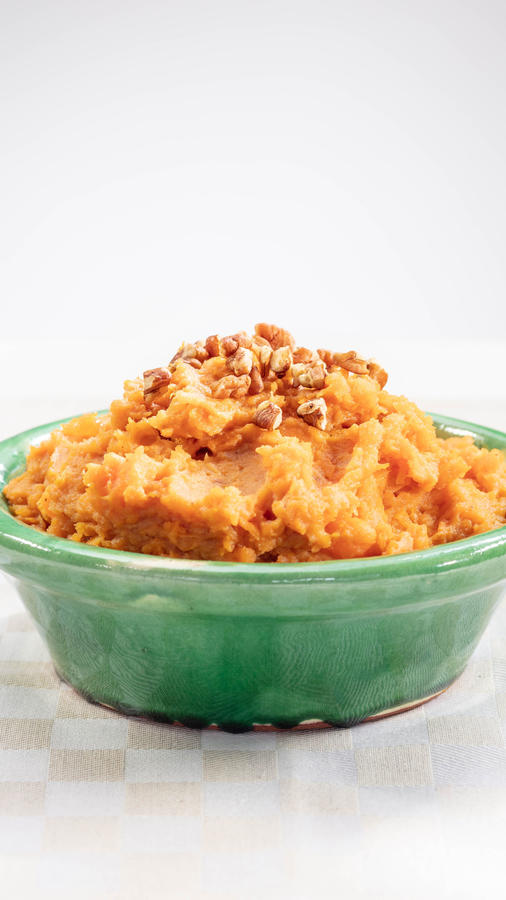
I selected this sweet potato dish to cook for our lunch and the result was so good that I will be making it for my Thanksgiving side dish this year. It’s also a conversation starter when you can explain it includes pecan milk. No need to buy whole pecans that are costlier than chopped since you want chopped pecans for the topping. Also you could substitute part or all of the peach preserves with frozen and defrosted coarsely chopped peaches for a lighter, less sweet version.

I like the added spicy hit of cayenne pepper but be sparing with it.

One day we traveled to Sunnyland Farms, a 1,760 acre farm nestled in the heart of Pecan Country (Albany, Georgia). Our group learned how the pecan is picked, cleaned, dried and packaged. We also tasted some delicious savory and sweet dishes, all accented with fresh pecans. This time of year is pecan season, which might explain why pecan pie is a favorite on the Thanksgiving dessert table. And by the way their pecan pie that they served us for dessert was out of this world. If you like you can order lots of items from them for your holiday gift giving. https://www.sunnylandfarms.com


Mashed Sweet Potatoes with Peach Preserves and Toasted Pecans

(This can be easily doubled or tripled)


Makes 4 to 6 servings


2 ½ pounds sweet potatoes, ends cut off

3 tablespoons butter

2/3 cup peach preserves

3/4-cup pecan milk or half-and-half

1/2 teaspoon salt

1/4 teaspoon black pepper

1/8 teaspoon cayenne pepper (optional)

1/2 cup chopped pecans


Directions:


  1. Toast the pecans by putting them in a nonstick skillet over medium-heat heat and toasting them by shaking the pan to evenly toast them. They should be fragrant and lightly browned. Reserve.


  1. Preheat the oven to 425°F. Line a baking sheet with parchment paper.


  1. Put the sweet potatoes on the baking sheet with a little space between each one. Roast until the skin collapses slightly and you can slide a knife through the thickest part of the flesh with no resistance, 45 minutes to 1¼ hours, depending on their size. When cool remove the sweet potato pulp and transfer into a medium bowl.


  1. Mash in 3 tablespoons butter and the peach preserves until melted and well blended. Drizzle in the pecan milk to desired consistency. The pecan milk will absorb into the potatoes so add enough for a mashed potato consistency. Season with salt, pepper and cayenne, if using. Taste for seasoning. Transfer to a serving bowl. Sprinkle the toasted pecans over the potatoes and serve immediately.


Pecan Milk


This super creamy pecan milk is so easy to make and has lots of uses like adding it to your coffee or using it as a non-dairy milk replacement in any recipe.


Makes about 1 1/4 cups


1/2 cup raw or freshly toasted pecans (see step 1 above for toasting pecans)

1 cup water

1 tablespoon maple syrup, to taste

1/2 teaspoon pure vanilla extract

Pinch of Salt


  1. Place the pecans in your blender and add 2 cups of water. Blend until the mixture is creamy and smooth, about 1 minute. (If using it for savory dishes omit the maple syrup and vanilla.)


  1. Add the maple syrup, the vanilla and a pinch of salt. Blend again to combine. Taste, add additional maple syrup if you’d like sweeter milk. No need to strain.

Bread and butter? Versatile Olive Oil Dips Take the Place of Butter

_MG_0540.jpg


We’ve come a long way from simple packaged breads that you can pick up at the supermarket. Here in Los Angeles bread bakeries are springing up across the city. My favorites are The Bread Lounge and Clark Street Bakery at the moment, each with their own spin on crusty, chewy baguettes as well as many other varieties. These toothsome loaves need a fresh accompaniment idea.

Bread and butter? Not so fast. Creative olive oil combinations have taken the place of butter as an accompaniment for bread. I prefer the fruity flavor of olive oil with bread. Even more delicious are blending different flavors together. These sauces become the center of the table and are a wonderful beginning to any Mediterranean-inspired repast. A glass of chilled Rose or Chardonnay would be a refreshing pairing.

As the weather heats up, you’ll appreciate how easy these are to prepare— no cooking required. I like to serve these sauces in small glass bowls with a spoon for people to help themselves. Make sure to have an assorted bread basket with French baguette, walnut, sourdough and Foccacia along with bread plates.

These versatile sauces are also a wonderful glaze on grilled chicken, fish or vegetables,. They can also be used as a simple sauce to pasta and a quick dressing to drizzle on your favorite greens. Look for Meyer lemon-flavored olive oil— it offers a slightly sweet yet tart flavor to the oil. If you can’t find it, add a bit of lemon juice and zest to the oil and go from there. Make sure to select a good quality robust extra virgin olive oil.

Olive Oil Dipping Sauces

Serves 4 to 6

Lemon, Olive and Dried Cherry Sauce

1/2 cup lemon olive oil

2 tablespoons good quality balsamic vinegar

2 garlic cloves, ends removes and sliced into very thin slivers

A few sprigs of fresh thyme leaves

2 tablespoons chopped kalamata olives

2 tablespoons chopped dried cherries

Freshly ground black pepper


  1. Combine all of the ingredients in small glass bowl and mix to combine. Cover and let rest for at least 4 hours so that the flavors have time to meld. Serve with a spoon or pour into small plates for serving with bread.


Advance Preparation: This can be made up to 1 week ahead and covered in an airtight container and kept at room temperature


Anchovy, Sun-Dried Tomato and Tapenade Sauce

1/2 cup fruity olive oil

2 tablespoons good quality balsamic vinegar

2 tablespoons chopped anchovies, (I prefer white anchovies if you can find them)

2 tablespoons green or black storebought Tapendade

2 tablespoons chopped oil-packed sun-dried tomatoes

1/4 1/teaspoon hot sauce or spicy chile paste, or to taste


  1. Combine all of the ingredients in small glass bowl and mix to combine. Cover and let rest for at least 4 hours so that the flavors have time to meld. Serve with a spoon or pour into small plates for serving with bread.


Advance Preparation: This can be made up to 1 week ahead and covered in an airtight container and refrigerated. Return to room temperature before serving.


Note: You can find white anchovies at gourmet specialty stores in the refrigerated section. They have a sweeter, milder flavor than regular canned anchovies.


Caramelized Banana Foster Bread: Coffee Cake or Dessert

bananas-foster-banana-bread-main

When the book Foster’s Market Favorites landed on my desk I was in heaven. Exquisite photography coupled with time-tested comfort dishes are highlighted from her amazing market in Chapel Hill, North Carolina. The introduction written by her husband tells her story— from her roots in Tennessee to finally settling in North Carolina where she and her market have become a culinary institution.


This book is a collection of Sara Foster’s recipes from areas of her past—Chicken Salad from Soho Charcuterie, NYC, Says Bread Pudding from her early Market days and a plethora of Southern dishes like Pecan Sweet Potato Sticky Buns and Foster’s Pimento Cheese. I couldn’t get enough of the photos which truly made me hungry when I had just finished lunch! Kudos to photographer Peter Frank Edwards.


I settled on testing this recipe after looking at the picture. One word for you—YUM! Easy to put together, this recipe has made it into my Seriously Simple fallback recipe file. I did a bit of tweaking the recipe by slicing the banana that is caramelized rather than keeping it halved. I also used rum instead of bourbon to switch it up. It was hard to let the bread cool because I wanted to dive into it as it sat on a rack resting. I served it for dessert with vanilla ice cream to raves at a casual dinner party and the next day as a coffee cake. Either way, this clever take on Bananas Foster from New Orleans will leave your guests asking for more.


Foster’s Caramelized Banana Foster Bread


½ cup light brown sugar

5 ripe bananas

2 tablespoons bourbon or rum

2 ¼ cups all-purpose flour

2 teaspoons baking powder

1 teaspoon ground cinnamon

½ teaspoon freshly grated nutmeg

½ teaspoon ground cardamom

¼ teaspoon salt

8 tablespoons (1 stick) unsalted butter, softened

1 cup sugar

2 large eggs

½ cup chopped pecans

1 teaspoon pure vanilla extract


1.Preheat the oven to 350°F. Grease and lightly flour a 9 x 5 x 3-inch loaf pan.


2.Spread the brown sugar evenly on the bottom of a cast -iron skillet over medium heat. Peel and slice 1 of the bananas into ½-inch slices and place on the sugar. Sprinkle the bourbon (or rum) over the top and cook, shaking the pan occasionally until the sugar melts and the banana begins to caramelize, about 3 minutes. Turn the slices over and continue cooking and caramelizing, about 2 to 3 more minutes, or until all slices are nicely caramelized. Remove from the heat and set aside until ready to use.


3.Combine the flour, baking powder, cinnamon, nutmeg, cardamom and salt in a large bowl and stir to mix.


4.In a separate bowl, with an electric mixer beat together the butter and sugar until soft and creamy, stopping to scrape down the sides of the bowl several times. Slowly add the eggs, one at a time, mixing well after each addition. Slice and add the remaining 4 bananas, pecans and vanilla, mixing to break up the bananas and combine.


5.By hand, stir the flour mixture into the banana mixture just until the dry ingredients are incorporated, being careful not to overmix. Pour the batter into the prepared pan and place on a rimmed baking sheet (this makes it easier to handle in and out of the oven).


6.Arrangethe caramelized banana slices evenly on top of the loaf and drizzle with any remaining caramel. Bake 1 hour to 1 hour and 10 minutes, until the bread rises and a wooden skewer comes out clean when inserted in the center.


7.Remove from the oven and let sit to cool, about 15 minutes. Run a knife around the inside edge of the pan, turn the loaf out onto a cooling rack and continue to cool more before slicing and serving, about 10 minutes.


bananas-foster-banana-bread-main.jpg


Cauliflower Steaks with Romesco Sauce

Cauliflower SteaksWhen Cara Mangini’s The Vegetable Butcher landed on my desk I wondered how she would write a whole book on butchering vegetables. I had only seen the term “vegetable butcher” when I visited Eataly in New York City. Boy, was I in for a delicious surprise. The author gives us all you might want to know about vegetables from selecting, prepping, chopping and of course cooking everything from artichokes to zucchini. This is my go-to vegetable reference book now.

Leafing through the beautiful pages I happened upon Cauliflower Steaks with Red Pepper Romesco Sauce and Crispy Breadcrumbs. I have been testing lots of cauliflower recipes and thought this looked like a must-try for me. These thick slabs of cauliflower, brushed with olive oil, roasted and browned, are topped with a vibrant red romesco sauce and a sprinkling of crisp breadcrumbs This would be a satisfying first or main course. The author suggests serving crisp Fingerling potatoes alongside, and some quickly steamed or sautéed kale, chard, spinach or arugula, to round out the plate.

This Catalonian-style romesco sauce—comprised of roasted red peppers, tomatoes, sherry vinegar, and a mix of almonds and hazelnuts can be made up to two days in advance and stored in a container in the fridge. If you are pressed for time, look for jarred roasted peppers and skip roasting and peeling them. The sauce will improve after all the ingredients have melded together. Any leftover sauce can be tossed with pasta, spooned over eggs, spread on toast, or drizzled on steamed or roasted veggies. You can also freeze it in ice trays for later use.

Cauliflower Steaks with Red Pepper Romesco Sauce and Crispy Breadcrumbs

Serves 4

1 large head or 2 small heads cauliflower

4 to 5 tablespoons extra-virgin olive oil

Coarse or flaked sea salt

Freshly ground black pepper

1 cup coarse fresh breadcrumbs

Red Pepper Romesco Sauce (recipe follows), for serving

  1. Preheat the oven to 450°F. Line a plate with paper towels.
  2. Cut the cauliflower into steaks: Cut off the stalk flush with the base of the crown. Stand the cauliflower upright and cut 1-inch thick slices, from the crown to the core end.
  3. Carefully transfer them to a rimmed baking sheet. Brush them evenly on both sides with 2 to 3 tablespoons of olive oil, and season generously all over with salt and pepper. Roast, turning halfway through cooking, until the steaks are browned on both sides and tender, 20 to 25 minutes.
  4. Meanwhile, heat 2 tablespoons of oil in a small skillet over medium heat. Add the breadcrumbs and cook, stirring often, until they become golden brown and toasted, about 6 minutes. Sprinkle them with salt and pepper to taste, transfer them to the lined plate to drain, and let them cool completely.
  5. Divide the steaks among plates and top each with a dollop of warm or room-temperature sauce and a sprinkle of toasted breadcrumbs. Serve immediately with extra romesco sauce for the table and the crispy potatoes, if you wish.

Notes:

  • A small head of cauliflower will yield 2 to 4 small steaks, so you’ll want to use 2 heads for 4 servings to guarantee each person gets a thick cut. A large head should give you 4 good-size steaks.
  • Use a wide spatula to carefully transfer the steaks to a baking sheet. Any pieces that do not hold together can be prepared the same way and served alongside the steaks.

Red Pepper Romesco Sauce

Makes 2 cups

2 medium red bell peppers

2 small to medium tomatoes (plum tomatoes are a good option), halved lengthwise

1 large garlic clove

1/4 cup toasted almonds

1/4 cup toasted hazelnuts

2 tablespoons sherry vinegar

1/8 teaspoon cayenne pepper

1/8 teaspoon smoked Spanish paprika

1 teaspoon fine sea salt

1/2 cup olive oil

  1. Preheat the oven to 450°F. Line a rimmed baking sheet with parchment paper.
  2. Place the peppers on their side on one end of the prepared baking sheet and the tomatoes, cut side down, on the other. Roast until the tomatoes are soft and the skin has just started to brown, about 15 minutes. Carefully remove the tomatoes from the baking sheet and transfer them to a plate to cool. Continue roasting the peppers until the skin blackens and blisters in places, 20 to 30 minutes more (35 to 45 minutes total). Transfer the peppers to a bowl, cover immediately with plastic wrap, and let cool.
  3. Meanwhile, pulse the garlic in a food processor until it is finely chopped. Add the almonds and hazelnuts and blend until they are finely chopped.
  4. Peel the cooled tomatoes using your fingers (and a paring knife if needed) to remove and discard the skins; place the tomatoes in the food processor.
  5. To peel the peppers, use your fingers to pull off the charred skin, then pull off the stem, cut open the peppers, and scrape out and discard the seeds. Transfer the flesh to the food processor.
  6. Add the sherry vinegar, cayenne, paprika, and salt. With the motor running, stream in the olive oil until the mixture is smooth. Heat the sauce or serve it at room temperature or cold, depending on the application. Thin it with water if you wish.

Cauliflower Steaks with Romesco Sauce

Chicken Matzo Ball Soup: A Passover Favorite


I’m not exactly sure why we begin each Passover meal with gefilte fish followed by chicken soup with matzo balls but I have been to enough Sedars to know that this is the unofficial beginning to a long and hearty repast. I love chicken soup year-round and especially when I am feeling the least bit low or sniffly. I am such a chicken soup lover that I always have a quart of this magical potion ready for any emergency stocked in my freezer. Every person who makes it has their own special touch, whether it’s the herbs, vegetables or how they make their matzo balls.

For Passover, however, I like to make my soup up a two or three days ahead to let the flavors mingle. Some of my friends insist on making it a month ahead and freezing it. That works well if you are just going to serve the broth and not the chicken and vegetables. I have made my share of chicken soup recipes. I find that this one, featured in my book Seriously Simple, is my current standby. This recipe gives you a head start because you begin with a good quality store-bought broth which immediately gives the chicken flavoring a headstart.. (Make sure to look for “Kosher for Passover” on the label.)

Skinless bone-in chicken breasts add more chicken flavor. (The bones help to enrich and slightly thicken the soup). The sweet carrot and parsnip flavor are accented by the onion-flavored chopped leeks. For a slight twist, I add tiny cherry or grape tomatoes 0along with chopped fresh mint.

This chicken soup cooks slowly on the stove until the chicken is cooked through and the vegetables are just tender. The chicken is cut up and returned to the soup awaiting its final pairing with the herbed matzo ball. If you prefer a lighter soup, strain out all the vegetables and chicken and just serve the broth with the matzo balls. (Use the reserved chicken to make chicken salad.

Matzo balls can really get a conversation started. There are those who love floaters and others who love sinkers. I think it has to do with ones early taste memories. I am a light matzo ball appreciator so you will find that these matzo balls are fluffy and floatable. What are my secrets? I use seltzer water to lighten them and I use schmaltz (rendered chicken fat) to enhance the flavor. Chopped fresh parsley and chives add both flavor and color to the pale beige dumpling. You can make up the matzo balls in the morning and keep them at room temperature in a little water until warming them in the chicken soup.


Help is on the Way:


  • Since the chicken soup begins with chicken broth that usually has some salt in it, salt the soup at the end of cooking
  • Schmaltz can be found in the frozen meat section of many supermarkets. You will also find it at kosher meat markets. Make sure to melt it before using.
  • Use Kosher for Passover oil if you can’t find schmaltz.
  • To lighten the matzo balls even further, separate the eggs andwhip up the egg whites separately. Fold the whites into the matzo ball mixture


Quick Chicken Vegetable Soup with Herbed Matzo Balls


Serves 6 to 8


2 medium whole chicken breasts, halved, skin removed, bone in

8 cups chicken broth

6 cups water

3 medium leeks, light green and white part cleaned, finely chopped

4 carrots, peeled and sliced 1/2-inch thick

2 ribs of celery, sliced 1/2 inch thick

2 parsnips, peeled and sliced 1/2-inch thick

2 tablespoons fresh mint leaves, coarsely chopped

4 cherry tomatoes, halved

Salt and freshly ground black pepper

2 tablespoons finely chopped parsley, for garnish


Matzo Balls

1/4 cup rendered chicken fat (schmaltz) or vegetable oil

4 large eggs, slightly beaten

1 cup matzo meal

2 tablespoons fresh parsley plucked and finely chopped

2 tablespoons fresh chives, finely chopped

1 3/4 teaspoons salt

1/4 cup seltzer water, any sparkling water


  1. Place the chicken breast, stock and water in a large pot. Bring to a boil on medium-high heat. Skim the soup. Add the onions, carrots, celery, parsnip, mint and tomatoes. Reduce the heat to low and simmer for about 1/2 hour or until the chicken is cooked and the vegetables are just tender. Skim periodically. Season to taste with salt and pepper.


  1. Remove the chicken breasts from the soup and cool slightly. With your hands remove the meat from the bones, making sure to discard any bone or cartilage; tear the chicken into bite-sized pieces and return to the soup. Cover the soup and refrigerate.


  1. To make the matzo balls, blend schmaltz or oil and eggs together with a whisk. Add the matzo meal, chopped herbs and salt to the egg mixture and stir together mixing well. Add the seltzer water and blend well. Cover the bowl and place in the refrigerator for half an hour for the mixture to thicken enough to make the matzo balls.


  1. Bring enough water in a large wide pot to come up 3/4 of the way to a boil on medium-high heat. Make the balls by rolling them very lightly into 1 1/2-inch balls. (The more you roll them, the tougher and heavier they will become.) Reduce the flame and drop the balls into the barely simmering water. Cover the pot and cook about 25 to 30 minutes or until cooked through.


  1. When ready to serve, remove the soup from the refrigerator and carefully remove any fat layer from the soup. Reheat the soup on medium heat for 15-20 minutes. Taste for seasoning. Add the matzo balls at the last minute just until heated through, about 3 to 5 minutes. Serve in large bowls and garnish with parsley.


Advance Preparation: The soup may be made completely ahead up to 3 days ahead, covered and refrigerated. The matzo balls can be made up to 4 hours ahead, covered and left at room temperature.


E-Cookbook Sale!

NOTE: This deal is no longer available. However, you can still purchase this book here: http://amzn.to/1saA0PR

For this month only, Chronicle Books is having a sale on Diane’s book, “Seriously Simple Parties.” You can get a copy of the E-Book for only 2 dollars! Be sure to check it out, as it contains a ton of great recipes for all of your summer get-togethers! http://www.chroniclebooks.com/ebook-deals/

SeriouslySimpleParties-276x300

Here are some of the details on the book:

From the author of Seriously Simple (more than 70,000 sold) comes another collection of enticing recipes and useful tips that will help make throwing a party just as much fun as attending one. Using straightforward ingredients, minimized prep time, and streamlined cooking techniques, hosts can serve festive meals with ease. Sample menus—organized seasonally for a variety of groups and occasions—and mix-and-match recipes for every course allow cooks of every skill level to make merry year-round. With great advice on everything from stocking a party pantry to setting an elegant table, plus vivid photos that will entice party planners into the kitchen, this book gives everyone a reason to celebrate.

Here’s what people have to say about this book:

“The PARTIES book is absolutely one of her best.  I’ve made nearly every one of the recipes, and as always, the ingredients are “seriously simple,” fresh and totally enticing, but more importantly for busy people, her instructions are clear, concise, and easy to follow.” –C.W.

“This book had so many great but easy recipes. Guest went crazy over food prepared for the brunch and wanted the recipes. This is a great book to give you easy but fancy and delicious meals. Highly recommend this book for those that like to entertain.”–J.N.


Passover Recipes – Sweet Treat on the Seder Plate

Every year Jews from around the world congregate to celebrate Passover with a Seder. The evening begins with the reading of the Haggadah, which tells the story of how the enslaved Jews escaped Egypt. Along with the four cups of wine, the table is adorned with a Seder plate that includes a number of symbolic items. There are bitter herbs to commemorate the bitterness of their enslavement in Egypt, a roasted shank bone to remember the lamb offering, and spring herbs that are dipped into salt water to remind us of the tears that were shed. But what gets most of the attention on the Seder plate is the sweet charoset.

Charoset is a symbol of the mortar that the Jewish slaves used. It is one dish that kids and adults alike look forward to each year for its sweet nutty goodness. Charoset is a sweet relish of fruit and nuts that is bound together with honey and a bit of Passover wine. It has many different spellings and just as many versions, depending upon the country where you live.

Ashkenazi (eastern European) Jews make a simple apple and nut mix. Sephardic Jews (Spanish, Asian and African) enjoy their charoset with roasted mixed nuts and dried fruit, and it is often cooked. It looks like fruit compote with nuts. Jews from other countries add chilies, spices and even chestnuts.

For the Seriously Simple recipe, click here.