Cool off with Farro Salad

Farro Salad
Grain salads are always a good solution to cooking on hot summer days. Cook up your grain in the early morning and then the kitchen will be cool. I love experimenting with different rice varieties, wheat berries, and cracked wheat to use as the base for cooling summer salads. I particularly like the toothsome, nutty quality of farro. Farro is an ancient strain of wheat that looks like plump barley kernels.

You can find faro in health food stores, gourmet food stores and now in many supermarkets. Don’t get confused with spelt. Spelt sometimes is called farro but tastes different and takes much longer to cook. Make sure to select whole grain farro; pearlized farro has the hull removed and cooks in half the time.. Some are quick cooking while this untreated whole wheat farro takes longer to cook. It’s best to check the package for what specific farro you buy. For this recipe I used Bob’s Red Hill organic Farro.

Higher in protein than pasta or rice, farro can be used in stews, soups, salads or as a substitute in rice dishes like risotto. Farro, pronounced Farr-oh, has recently has become a grain that Americans love to eat. An added plus is that farro is recommended for diabetics. You can have fun with different variations on this salad. Sometimes I’ll add sliced peaches and sliced burrata or mozzarella cheese and finish it with a drizzle of balsamic syrup. Feel free to mix up the vegetables called for the tasty tips below.

This is a variation on tabouli, the Middle Eastern cracked wheat salad traditionally made with olive oil, lemon, mint, tomato, and loads of parsley. While some recipes insist on soaking the farro before cooking I have found that the method below works beautifully and will have a distinctive al dente crunchiness. In this recipe mint and tomatoes are replaced with chopped cucumber, radishes, and fresh goat or feta cheese. Serve this with a chilled soup on a hot summer night for a light and satisfying dinner.

Tasty Tips:

  • Add a cup of cooked vegetables like chopped green beans, squash, corn, asparagus tips, broccoli or cauliflower florets.
  • For a more substantial salad add a cup of cooked shredded chicken or cold diced shrimp.
  • Feel free to double this recipe.
  • Cooked corn is an excellent addition.

Farro Vegetable Salad

Serves 4

1 cup whole wheat farro (I used Bob’s Red Hill organic Farro)

3 1/2 cups water

1/2 teaspoons salt

2 tablespoons finely chopped red onion

1/2 cup finely diced European cucumber

3/4 cup finely diced radishes

3/4 cup peeled and finely diced carrots

2 tablespoons finely chopped parsley

2 tablespoons finely chopped fresh chives

2 tablespoons finely chopped basil

1/2 cup favorite vinaigrette

2 tablespoons fresh lemon juice

Salt and pepper to taste

1/2 pound goat or feta cheese, crumbled

Garnish

Parsley leaves

  1. Rinse and drain in a fine-mesh colander set in a sink. Transfer the farro into a large saucepan, cover with water, add salt and bring to a boil over high heat. Reduce the heat to low and simmer, covered until tender, about 30 minutes. The farro should have a little bite to it. Drain again in the colander, and place in a serving bowl. Cool to room temperature.
  1. Add the red onion, cucumber, radishes, and carrots. Mix with a two-pronged fork, adding the parsley, chives, and mint.
  1. To make the dressing, combine the vinaigrette, lemon juice, salt, and pepper in a medium bowl and whisk until incorporated. Taste for seasoning.
  1. Pour the dressing over the farro and mix with a fork to fluff the farro. Carefully add the goat or feta cheese. Taste for seasoning and garnish with parsley leaves. Chill for at least 3 hours. Serve chilled and garnish just before serving.

Advance Preparation

Can be prepared 4 hours ahead, covered, and refrigerated until serving.

No Fail Popovers Are Over the Top

Each year I visit New York City as a committee member for James Beard Awards.. Our committee is always looking for great places for breakfast. I had heard that The Society Café attached to the Walker Hotel had wonderful breakfasts. Don’t miss a chance to visit this charming breakfast venue. It really is worth it. We were served tender, light yet crispy popovers– the American version of English Yorkshire Pudding. Puffed and golden brown, these perfect popovers became my gold standard. I noticed that the chef’s recipe called for warm milk that seemed unusual.

And then I stumbled on my dear friend and colleague Marlene Sorosky’s Over the Top Popover recipe. Marlene is one of the most accomplished cooking teachers in the USA and has written many cookbooks. She tested this over 25 times to get it to her satisfaction.

Her popover recipe, which is similar to the chef’s at Society Café, tells the reader that adding hot milk to the batter allows the eggs to stablize and support the batter. She bakes them at 375F for the whole time and only heats the pans for a couple of minutes prior to pouring the batter into the tins.  Her best tip is that you can make them in advance and hold them up to 4 hours— all they need is a quick reheat. She actually thinks they are better! You can find a few other popover variations at https://www.cookingwclass.com.

I love to serve these for breakfast with cherry or apricot jam and sweet butter. They are also a delcious accompanimemnt to a brunch egg dish or for lunch. Frankly there is never a bad time to induldge in these airy, crispy, golden brown puffs of goodness.


OVER THE TOP POPOVERS

This recipe makes 6 large popovers in a standard popover pan or 10 smaller ones in a mini popover pan, standard muffin tin, or 1/2 cup custard cups.


1½ cups whole, low-fat or nonfat milk

3 large eggs

1½ cups all-purpose flour

1½ teaspoons kosher salt

2 teaspoons sugar

3 tablespoons unsalted butter, melted, optional

Pan spray


  1. Heat the milk in a saucepan until bubbles appear around the edges of the pan. Or, heat in a microwave until hot, but not boiling. The hot milk allows the eggs to stablize and support the batter.


  1. Mix the eggs in a mixing bowl with an electric mixer, by hand with a whisk, in a blender or a food processor, until frothy. While mixing, gradually pour in the hot milk. Add the flour, salt and sugar; mix on low until thoroughly incorporated, scraping down the sides as needed. Mix in the melted butter, if using. Cover and refrigerate at least 1 hour or up to 24 hours.


  1. Position a rack in the middle or lower third of the oven. Preheat a conventional oven to 375° or convection oven to 350°. Place the popover pan, standard muffin tin or custard cups in the oven for 2 to 3 minutes.  Remove from oven and spray the sides and top edges of cups with pan spray.


  1. Whisk the batter well and divide among the cups, filling almost to the top.  Bake until puffed and deeply browned, 35 to 40 minutes for small popovers, 45 to 50 minutes for large ones. The longer they bake, the less they will deflate when you take them out.  If they are browning unevenly the last 10 minutes, rotate the pan.


  1. Remove the popovers from the pan and serve immediately.


  1. Or, for crisper popovers, remove them to a rimmed baking sheet where they can be held uncovered for up to 4 hours. Before serving, preheat the oven to 450° and reheat for 3-5 minutes or until hot and crispy.


A Taste of Georgia in a Dish: Mashed Sweet Potatoes with Peach Preserves and Toasted Pecans

Recently I attended the Chef’s Pecan Culinary Summit in Atlanta along with other chefs from around the country. Pecans were discovered in central and eastern North America in the 1600’s and have flourished ever since. They have been an important commodity for trade. We learned why pecans are a versatile nut that is not only delicious but also nutritious.


Pecans are heart healthy and are packed with 19 vitamins and minerals along with fiber, protein and are sodium-free. I learned how versatile the creamy, toasty pecan could be as we cooked dishes that added the chopped pecans to meatballs, pizza crust, and filling for tacos. We also stuffed them in pitted dates, wrapped in bacon and roasted til crisp. All of these unusual applications were happily surprising and plenty tasty.


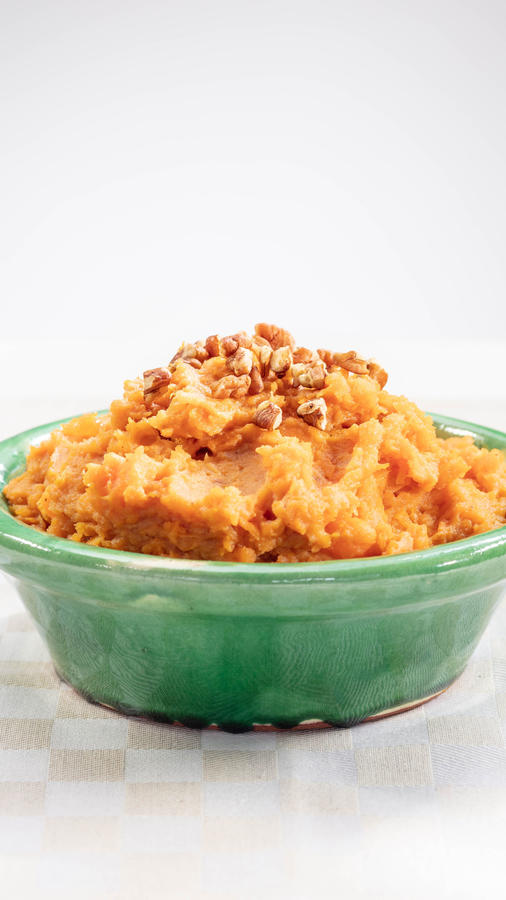
I selected this sweet potato dish to cook for our lunch and the result was so good that I will be making it for my Thanksgiving side dish this year. It’s also a conversation starter when you can explain it includes pecan milk. No need to buy whole pecans that are costlier than chopped since you want chopped pecans for the topping. Also you could substitute part or all of the peach preserves with frozen and defrosted coarsely chopped peaches for a lighter, less sweet version.

I like the added spicy hit of cayenne pepper but be sparing with it.

One day we traveled to Sunnyland Farms, a 1,760 acre farm nestled in the heart of Pecan Country (Albany, Georgia). Our group learned how the pecan is picked, cleaned, dried and packaged. We also tasted some delicious savory and sweet dishes, all accented with fresh pecans. This time of year is pecan season, which might explain why pecan pie is a favorite on the Thanksgiving dessert table. And by the way their pecan pie that they served us for dessert was out of this world. If you like you can order lots of items from them for your holiday gift giving. https://www.sunnylandfarms.com


Mashed Sweet Potatoes with Peach Preserves and Toasted Pecans

(This can be easily doubled or tripled)


Makes 4 to 6 servings


2 ½ pounds sweet potatoes, ends cut off

3 tablespoons butter

2/3 cup peach preserves

3/4-cup pecan milk or half-and-half

1/2 teaspoon salt

1/4 teaspoon black pepper

1/8 teaspoon cayenne pepper (optional)

1/2 cup chopped pecans


Directions:


  1. Toast the pecans by putting them in a nonstick skillet over medium-heat heat and toasting them by shaking the pan to evenly toast them. They should be fragrant and lightly browned. Reserve.


  1. Preheat the oven to 425°F. Line a baking sheet with parchment paper.


  1. Put the sweet potatoes on the baking sheet with a little space between each one. Roast until the skin collapses slightly and you can slide a knife through the thickest part of the flesh with no resistance, 45 minutes to 1¼ hours, depending on their size. When cool remove the sweet potato pulp and transfer into a medium bowl.


  1. Mash in 3 tablespoons butter and the peach preserves until melted and well blended. Drizzle in the pecan milk to desired consistency. The pecan milk will absorb into the potatoes so add enough for a mashed potato consistency. Season with salt, pepper and cayenne, if using. Taste for seasoning. Transfer to a serving bowl. Sprinkle the toasted pecans over the potatoes and serve immediately.


Pecan Milk


This super creamy pecan milk is so easy to make and has lots of uses like adding it to your coffee or using it as a non-dairy milk replacement in any recipe.


Makes about 1 1/4 cups


1/2 cup raw or freshly toasted pecans (see step 1 above for toasting pecans)

1 cup water

1 tablespoon maple syrup, to taste

1/2 teaspoon pure vanilla extract

Pinch of Salt


  1. Place the pecans in your blender and add 2 cups of water. Blend until the mixture is creamy and smooth, about 1 minute. (If using it for savory dishes omit the maple syrup and vanilla.)


  1. Add the maple syrup, the vanilla and a pinch of salt. Blend again to combine. Taste, add additional maple syrup if you’d like sweeter milk. No need to strain.

Pan con tomate is summer in a bite

image.png

As the heat continues to be oppressive, I look for dishes that require little or no cooking and are easy to prepare. Tapas, those little bites you can find at bars all over Spain, come to mind.

Pan con tomate is summer in a bite. For these tomato toasts, you’ll need good-quality extra-virgin olive oil, chewy bread, a couple of ripe beefsteak tomatoes, sea salt and my secret ingredient: white anchovies. I prefer the white anchovy to the saltier canned anchovies. You can find them in the refrigerated section at your gourmet store or well-stocked grocery store. They add just the right complementary touch to the tomato-garlic flavor.

This no-cook app is Seriously Simple to put together. You can broil, toast or grill the bread, depending upon your preference. I love the rustic touch of fresh, aromatic garlic smeared over the crisp toasts. Some recipes call for just the tomato pulp spooned on top of toasted bread. Others like to strain the pulp and use the juice to infuse the bread; then the remaining pulp is spread on top. Some also add seasonings and oil to the tomato pulp. My version of these tasty summer morsels includes a finishing dab of garlic mayonnaise to tie all the flavors together

These toasts certainly are a good way for using up bread and very ripe tomatoes. I’ve had fun trying different tomato varieties and using different breads, such as a baguette. I’ve served these as a snack in the later afternoon and as an opener to a barbecue. They’re also lovely with a bowl of chilled soup. A chilled bottle of rose to accompany these toasts is my preference. Remember, this is a template for you to use; feel free to put your own signature on this dish.

Tomato Toasts (Pan Con Tomate)

Serves 8 as an appetizer

1 clove garlic, minced

1/4 cup mayonnaise

1 ciabatta loaf

Extra-virgin olive oil

2 large ripe beefsteak tomatoes, halved to make 4 halves

Salt

Pepper

2 medium cloves garlic, split in half

White anchovies

Sea salt

1 tablespoon chopped Italian parsley

1. Combine the garlic and mayonnaise in a small bowl and mix to combine. Reserve.

2. Split ciabatta in half horizontally lengthwise, and then cut crosswise into 1 1/2-inch slices. Lay them flat on a baking sheet. Lightly sprinkle olive oil over the bread slices.

3. Place a box grater using the large holes in a medium bowl. Grate the flat side of each tomato half into the bowl. Discard the skin of each half. You will have tomato pulp with the seeds. Season with salt and pepper. Reserve.

4. Preheat the broiler to broil. Broil the bread slices for about 3 minutes or until they are nicely browned. (You can also toast or grill the bread.) Remove from the oven and rub the garlic halves on each bread slice.

5. Spoon some of the tomato pulp on each slice of bread, pushing it down so it infuses into the bread.

6. Cut each anchovy in half. Place the anchovy crisscrossed on top of the bread. Spoon a tiny dollop of garlic mayonnaise on top. Garnish with a sprinkling of sea salt and parsley. Transfer the toasts to a large platter, and serve.

Sweet Peas, Sugar Snaps and Lettuce Add up to a Cool Soup

1C-66063 P66

Sweet peas and sugar snap peas are the foundation of this chilled soup. Butter lettuce lends an interesting sweet flavor and thickening texture to the soup. Influenced by the classic French braised peas and lettuce dish, this soup is a cup of green comfort when it’s hot outside. Try to cook this in the morning before the kitchen becomes too hot and then chill it for either lunch or dinner. Sometimes I like to serve this in little cups or shot glasses instead of a traditional appetizer. It is also nice as a first course soup.


This garden green blend of sweet lettuce, mint, sugar snap and baby peas seem made for each other. If you can find fresh, just-picked peas use them. Look for small peas for best flavor. Sometimes, if the peas are too large or older than a few days they will be starchy and even slightly bitter. To make it Seriously Simple and ensure a tasty result, prepare the soup with frozen petit peas that have been defrosted. Remember they don’t need much time to cook so adjust the time  (see step 2).


Fresh mint is a wonderful complement to the flavor of peas. There are many varieties of fresh mint such as lemon, pineapple, orange, spearmint and even chocolate. Look for a simple mint that will work best in this recipe. If you want to have mint on hand at a moments notice try growing it in a pot on your windowsill or in your yard. It’s best to grow mint in pots because mint has a way of taking over your garden. You can also serve this as a hot soup.


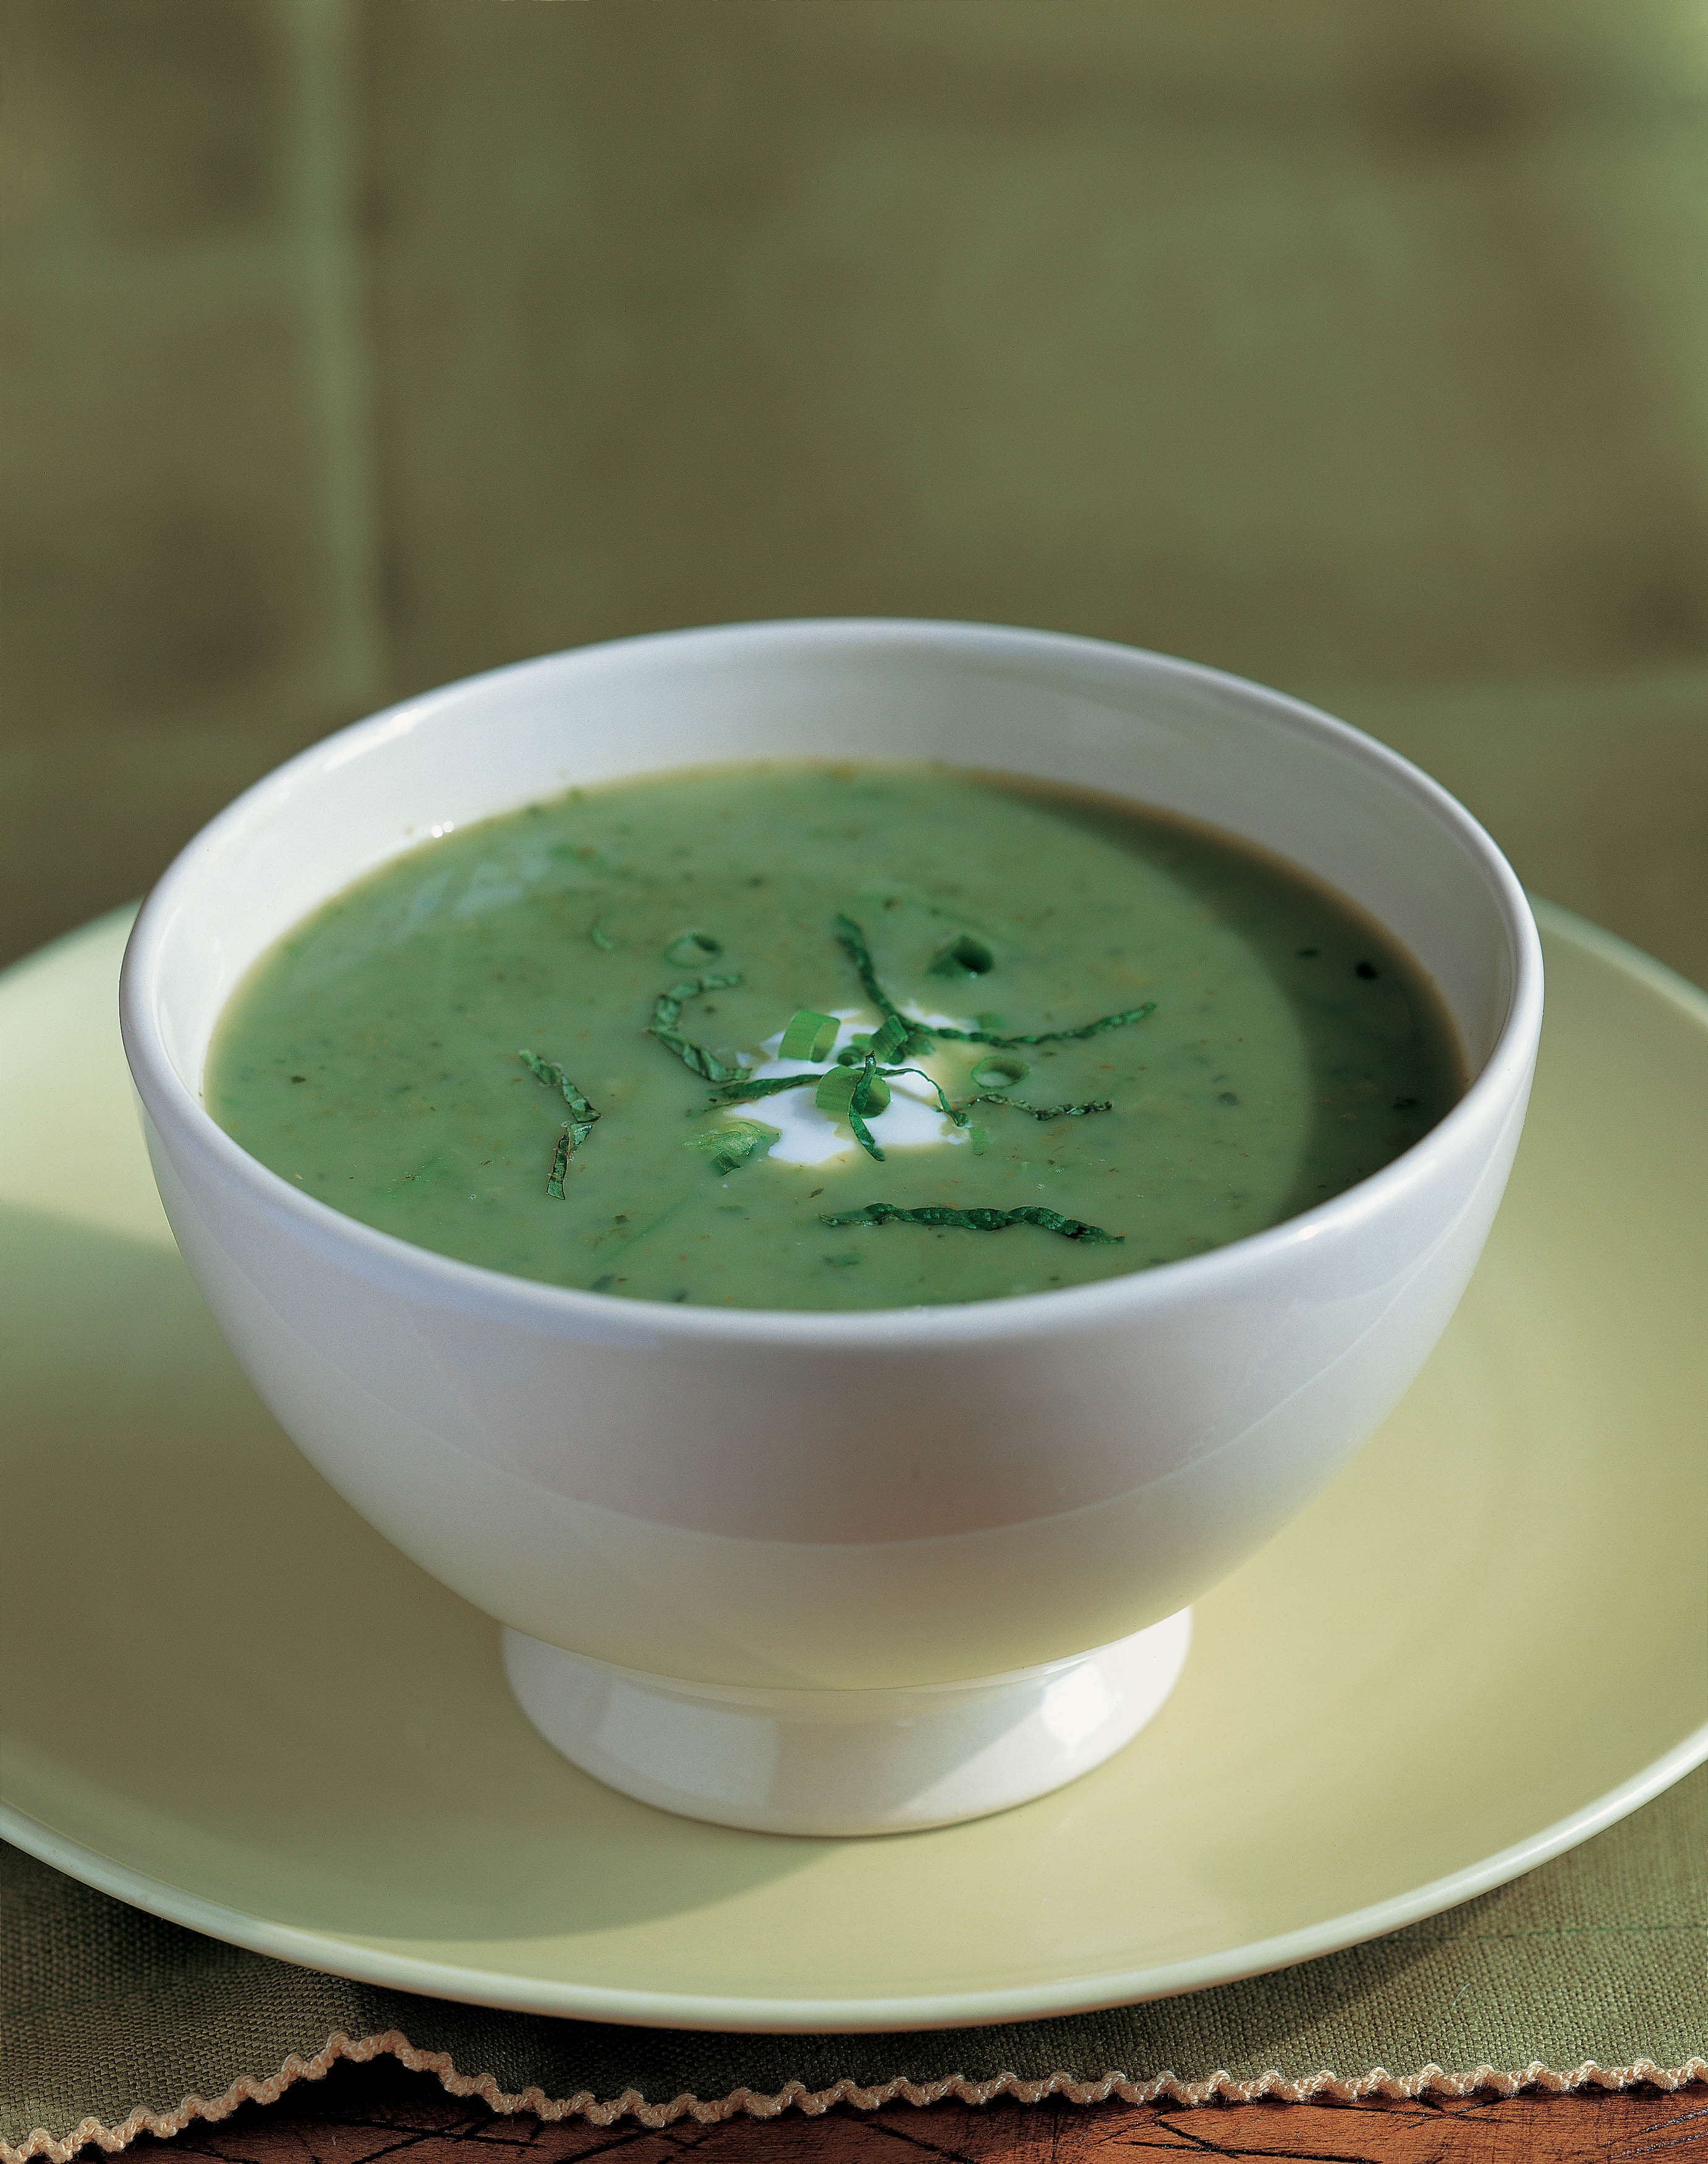
Chilled Sugar Snap, Sweet Pea and Lettuce Soup with Fresh Mint


Serves 4


2 tablespoons olive oil

6 scallions, white part only, finely chopped

1 small head butter lettuce, cored and shredded

3 tablespoons coarsely chopped mint

4 cups chicken stock

1 cup or 1/2 pound sugar snap peas, cleaned and trimmed, coarsely chopped

1 cup fresh shelled peas (about 1 pound unshelled) or 1 cup of defrosted frozen tiny peas

Salt and white pepper, to taste

1 tablespoon fresh lemon juice


1/4  cup sour cream, for garnish

1 tablespoon finely chopped mint, for garnish


  1. Heat the oil in large saucepan over medium heat. Add scallions and saute, stirring occasionally, for about 3‑5 minutes or until softened. Add lettuce and saute until it is wilted, about 5 minutes. Add the mint, stock, sugar snap peas, and the shelled peas (if using frozen, defrosted peas, add during the last five minutes). Cover and simmer fifteen to twenty minutes, or until the sugar snap peas are nicely softened. Add salt, pepper and lemon juice.


  1. Place the soup in a blender process until pureed. Transfer to a bowl, taste for seasoning and cover well.


  1. Refrigerate soup for about at least 4 hours or until chilled; taste for seasoning right before serving. (Chilled foods often need seasoning just before serving.)


  1. To serve, ladle soup into bowls and garnish with sour cream and chopped mint.1C-66063 P66

Add an Asian Touch to your Fourth of July Barbecue with Ahi Burgers with Ginger Sesame Mayonnaise


There is nothing like a Fourth of July barbecue. Kids and adults love the patriotic fanfare as well as the smoky-sweet barbecue aroma in the air on this special day. I think I have made the gamut of dishes that somehow have come to signify Fourth of July. From southern pulled pork to ribs of every kind, I’ve kicked up the flavors and reimagined grilled sausages, burgers of every kind, steaks, and salads galore. When I want a simple menu I like to offer my standard juicy beef burgers and add one other burger to satisfy the non-meat eaters at my gathering.

This Ahi Burger with Ginger Sesame Mayonnaise is a true crowd-pleaser. Fresh tuna has become a staple at most supermarkets. Select tuna that is very fresh and doesn’t have a bloodline running through it. The tuna is finely chopped by pulsing it in the food processor with plenty of garlic and fresh basil. Once refrigerated and firm, they are grilled until medium. You can double or triple this recipe but do it in batches. Sometimes I add a slice or two of avocado on top of the lettuce. Make sure the burgers are not overcooked or they will be dry.

To round out your meal consider adding your favorite coleslaw or potato salad, grilled fresh corn on the cob and a fresh fruit platter for a colorful menu.  You can also sauté the burgers in a large skillet over medium-high heat if weather isn’t cooperating for barbecuing. And another variation is to make these into sliders (about 3 inch min-burgers with mini-buns) and serve as an appetizer.  I also love to serve this ginger sesame flavored mayonnaise as a dipping sauce for a vegetable platter (crudités) that includes carrots, pea pods, baby tomatoes and asparagus. Raise a glass of chilled Rose to celebrate our country’s independence and enjoy your day.


Ahi Burgers with Ginger Sesame Mayonnaise

Serves 4


Burgers

4 cloves garlic, peeled

1 3/4 pounds fresh, well-chilled tuna fillets, trimmed of any dark spots and cut into large chunks

3 tablespoons olive oil

1/4 cup chopped fresh basil

2 teaspoons anchovy paste

1/2 teaspoon freshly ground black pepper


Ginger Sesame Mayonnaise

½ cup mayonnaise

1 1/2 teaspoons toasted sesame seeds

1/2 teaspoon sesame oil

1/2 teaspoon Champagne vinegar or white wine vinegar

1 teaspoon finely chopped pickled ginger

Dash hot pepper sauce, such as Sriracha


To Serve

4 brioche orother soft hamburger buns, sliced and toasted

4 medium crisp butter or romaine lettuce leaves


  1. In a food processor, mince the garlic. Add the tuna, olive oil, basil, anchovy paste and pepper and pulse until the mixture resembles the texture of ground meat. Divide the mixture into 4 balls and form them into 1-inch-thick patties. Place on a waxed paper-lined baking sheet. Cover and refrigerate for at least 30 minutes.


  1. To prepare the mayonnaise: In a small bowl stir together the mayonnaise, sesame seeds, sesame oil, vinegar; and ginger; season with the hot pepper sauce. Cover and refrigerate until ready to use.


  1. Heat the grill to medium high heat with a perforated grill sheet on top that has been sprayed with non-stick cooking spray. Place the tuna patties on the grill and cook for about 2 minutes on each side for medium.


  1. To serve, spread a tablespoon of mayonnaise on the bottom half of the toasted buns. Place the lettuce leaves on top. Place the burgers on top and dollop a tablespoon of the mayonnaise on the burger. Cover with the bun tops. Serve immediately.


Advance Preparation: May be prepared through step 2 up to 6 hours ahead. Keep the burgers and mayonnaise covered and refrigerated.


Homemade French Fries are Worth the Time


I love French fries but I try to be good when I am out at a restaurant. If I really want them I make them myself. French fries aren’t hard to make. They just require some advance organization, a few tools like a sharp knife, a deep fryer or a deep heavy cast iron skillet, a fry basket and a deep fry thermometer. The key to crisp French fries is using fresh oil, having the oil at a constant high temperature and making sure that the potatoes are dried. As far as how many these will serve it really depends upon who is eating them. I figure on a potato per person but you can judge how much you need depending upon your group,

The traditional method requires cooking the potatoes twice. The first cooking time sets the potatoes and cooks them inside. The second cooking time finishes cooking the potatoes and makes them crisp and golden brown. Don’t crowd the potatoes because this will bring down the frying temperature and make the French fries too oily. Remember the temperature goes down as soon as you add the potatoes which is why it may take a few more minutes for the first frying. You’ll also find methods for frying shoestring below.

While the recipes here recommend peeling the potatoes, you may prefer a more rustic presentation with the peel on. Either way they’re delicious.

There a number of ways to cut the potatoes: try the French fry cutter disc on the food processor, any of the French fry gadgets or a very sharp knife. If you like to dip your fries why not try a garlic mayonnaise instead of ketchup? Or offer both if you can’t decide. Serve these on a plate or in a basket.

French Fries

Makes 4 servings or 1 medium potato per serving (depending upon your appetite)

2 pounds baking potatoes or 4 medium baking potatoes

Peanut oil

Salt

  1. Peel the potatoes and cut into 3/8-inch by 3/8-inch by 4-inches. Cover in cold water for a few minutes to remove excess starch.
  2. Heat about 3 inches of oil to 330 F in a deep fryer with a basket or in a heavy deep pan. If you don’t have a deep fryer use a deep-fry thermometer to register the temperature. If you don’t have a basket to keep the fries together use a pair of long tongs to remove them from the oil.
  3. While the oil is heating dry the potatoes carefully with dishtowels. (Wet potatoes splatter and may stick together.) Immerse the basket in the hot oil to avoid the potatoes sticking. Remove the basket from the oil.   Place 2 cups of potatoes at a time in the basket or in the pan and lower into the oil. The oil will expand and cover the potatoes. Fry for about 4 to 5 minutes or until the potatoes are light yellow but have not started to brown. Adjust the temperature so it stays at 330 F. Make sure that you do not crowd them. Remove the basket over a bowl to drain and then set aside for at least 10 minutes. These may be held at room temperature for up to 2 hours.
  4. Right before serving heat the oil to 370 F and fry the potatoes, in batches, for about 3 to 4 minutes or until golden brown and crisp. Remove the basket and drain over a bowl. Transfer and drain on paper towels. Place in a serving bowl or basket, season with salt and serve immediately.

Shoestring Potatoes: These are only cooked once. Cut peeled potatoes into skinny (1/4-inch by 1/4-inch by 3-inches) strips. Cover in cold water for a few minutes to remove excess starch. Heat the oil to 375 F. While the oil is heating dry the potatoes carefully with dishtowels.   (Wet potatoes splatter.) Add the potatoes in batches, (1 potato at a time) stirring with long tongs to make sure they don’t stick together. When golden brown, remove the basket over a bowl to drain and then turn out on paper towels to blot the excess oil off. Place in a bowl or napkin-lined basket, season with salt and serve immediately.

Irish Soda Bread

As a seasoned cook, I am always surprised when I come across well-known recipes I’ve never tried. I have made many quick breads but never Irish soda bread. Quick breads, by definition, use baking powder, soda or cream of tartar rather than yeast to leaven the breads. In this case, both soda and baking powder are used. These breads are made quickly and with little stirring so that the ingredients have the ability to rise. Recently I came across this recipe from famed Napa Model Bakery’s cookbook (“The Model Bakery Cookbook,” by Karen Mitchell and Sarah Mitchell Hansen, Chronicle Books, 2013) and had to try it.

Many Americans think of Irish soda bread around St Patrick’s Day since it is traditional to serve it alongside corned beef and cabbage. I decided to get a head start on that menu and tested this very recipe on a dreary winter day. I was fighting a cold and thought it might lift up my spirits — which it did. The authors suggest you will get a much better rise by adding both baking soda and powder together, along with the requisite buttermilk to help stir up the leavening action. What I love about this bread is that it is very crusty on the outside and the bottom of the loaf but the interior has a tender crumb.

920x920.jpg

This is so fun to make and takes almost no time to put together. Some suggest that the real Irish soda bread had neither sugar nor dried fruit or caraway seeds. I find that adding them to the dough gives a lovely sweet and savory element to the bread. You could use dried cranberries or raisins instead of the currants, if you prefer. Serve this along with any meal — or you can think of this as a giant scone and serve it for either breakfast or tea. Be sure to have some soft unsalted butter to accompany. To sweeten it up, try a lovely fruit jam or even lemon curd. Make sure to serve it warm out of the oven. I also like to serve it along with a hunk of sharp cheddar cheese and a crisp sliced apple.

Irish Soda Bread

Makes 1 loaf.

2 1/2 cups unbleached all-purpose flour, plus more for the pan and top of the loaf

3 tablespoons sugar

1 1/2 teaspoon baking powder

1 teaspoon baking soda

1 teaspoon fine sea salt

3 tablespoons cold unsalted butter, cut into half-inch pieces

1/2 cup dried currants (optional)

1 tsp caraway seeds (optional)

1 cup plus 2 tablespoons buttermilk, as needed

1. Position a rack in the center of the oven and preheat to 400 F. Dust the bottom of an 8-inch round cake pan with flour.

2. Sift the flour, sugar, baking powder, baking soda and salt together into a large bowl. Add the butter and stir to coat with the flour mixture. Using a pastry blender or two knives, cut in the butter until the mixture is crumbly, with some pea-size pieces of butter. Stir in the currants and caraway seeds (if using). Stir in enough of the buttermilk to make a moist, soft dough, being sure to moisten all of the dry bits on the bottom of the bowl. Knead in the bowl just a few times to be sure the dough comes together — this is not a smooth dough.

3. Turn out the dough onto a lightly floured work surface and shape into a ball. Sprinkle the top with at least 1 tablespoon flour to give the loaf a rustic look. Transfer to the prepared pan. Using a sharp knife, cut a shallow 4-inch wide X in the top of the dough. The X will open during baking and help the loaf bake more evenly.

4. Bake until the top is deep golden brown and the bread sounds hollow when tapped on the bottom, 35 to 40 minutes. Remove from the pan. Let cool on a wire cooling rack for 5 to 10 minutes, and serve warm. (The bread is best the day it is made.)

Celebrate St Patrick’s Day with Glazed Corned Beef and Caramelized Cabbage


Corned beef and cabbage might be the ultimate Seriously Simple recipe. What could be easier than slowly cooking a corned beef with winter vegetables? Not much. You can either cook this in a large pot on the stove or use a large slow cooker. The key is to make sure that the meat is fork tender.

You’ll find uncooked seasoned corned beef in the meat section of your market this time of year. If you are serving a crowd you will want to double this recipe because a 4 pound corned beef will serve 6 at most. Corned beef brisket will shrink more than you think, so plan accordingly.

Each year I make the standard corned beef and cabbage and it is always well received. This year I wanted to shake it up a bit so I decided to glaze the corned beef and caramelize the cabbage for a surprisingly delicious, yet familiar meal. Cooking in stages is one of the secrets to being a Seriously Simple cook. Here you can cook the corned beef and sauté the cabbage hours ahead so the last minute cooking is minimal. These steps can be done up to 6 hours ahead.

Most recipes call for serving the corned beef, cabbage and root vegetables right out of the pot. This rendition cooks the corned beef completely and then is finished with a sweet and savory apricot mustard glaze that adds a wonderful flavor dimension. Cabbage is one of those vegetables that I think is very underrated. I am a big fan of sautéing it to bring out its’ sweetness. The leeks add even more garden sweetness. It’s easy to do this while the corned beef is simmering.

Make sure to reserve the broth for cooking the root vegetables. The pickling spices from the broth add a tangy, savory flavor to the winter root vegetables. To drink, try an Irish stout, of course! If you have time make the soda bread (see recipe) to accompany this classic dish.


Glazed Corned Beef on a Bed of Caramelized Cabbage with Root Vegetables

Serves 4 to 6

1 (4) pound corned beef


Caramelized Leeks and Cabbage

2 tablespoons olive oil

1 tablespoon unsalted butter

2 leeks light green and white part, cleaned and thinly sliced

1 medium cabbage, cored removed and thinly shredded

Salt and freshly ground black pepper


Glaze

¼ cup whole grainy Dijon mustard

¼ cup apricot preserves

½ teaspoon light soy sauce


Root Vegetables

6 medium carrots, peeled and cut into 2 inch pieces

2 parsnips, peeled and cut into 2 inch pieces

8 to 10 small unpeeled white or red potatoes

2 tablespoons finely chopped Italian parsley


  1. Place the corned beef along with the pickling spices in a pot and cover with cold water. Bring to a boil and then reduce the heat to a low simmer and cook for about 4 hours or until fork tender. (Think about 1 hour for each pound.) Remove from the pot, drain and place on a baking sheet. Reserve the broth.


  1. Meanwhile heat the oil and butter in a large skillet on medium heat. Add the leeks and sauté about 7 to 10 minutes or until nicely softened and lightly browned. Add the cabbage and toss with the leeks, cover and cook for about 10 more minutes or until starting to soften.


  1. Remove the cover and turn up the heat to medium-high and continue cooking until the cabbage is wilted and beginning to caramelize. Add salt and pepper, about ½ cup of the corned beef broth and cook until the cabbage is moist but no liquid remains. Season to taste. Reserve.


  1. Preheat the oven to 375 F. Make the glaze: combine the glaze ingredients in a small bowl and spoon evenly over the cooked corned beef.


  1. Bake until the glaze is bubbling and brown, about 20 minutes. Place on a carving board, let rest 10 minutes. Slice the corned beef across the grain into ¼-inch slices.


  1. While the corned beef is in the oven add the vegetables to the broth and bring to a boil on heat; reduce the heat to medium and simmer for about 15 minutes or until the vegetables are tender when pierced with a fork.


  1. To serve: Spoon the braised cabbage on a rectangular platter. Arrange the drained vegetables around the side. Arrange the corned beef slices on top of the cabbage. Spoon a bit of the broth on top, garnish with parsley and serve immediately. (You can also serve on individual plates.)


Advance Prep: This can be made through step 3 up to 6 hours ahead. Cover and refrigerate the corned beef until continuing. Cover the cabbage and gently reheat just before serving. Remember to reserve the broth.


Make Valentine’s Day Extra Sweet

Valentines Day can often feel like a forced day to be happy and in love. For me, it’s a time to remember those I love. Sometimes I celebrate with just my husband and other times I invite friends into the fold to have a delicious meal and stimulating conversation. Even those that are having a hard time can’t help but relax and enjoy when this dessert is served. And it is truly Seriously Simple to prepare.

I have made many a chocolate cake, each that have their own special attributes— Ones that have multi-layers with different buttercreams, ones with ground nuts instead of flour, ones covered with chocolate ganache and then there is this one. The rich chocolatey batter is embedded with chunks of caramel that soften and melt slightly as the cake bakes. A light sprinkle of sea salt adds an even richer taste sensation. If you make this ahead just make sure to warm it before serving. Don’t worry if you have leftovers. Just freeze, defrost and enjoy for another meal.

Kudos and thanks go to well-respected cookbook author and blogger Betty Rosbottom who concocted this heavenly combination. I found this recipe on her website and contacted her (bettyrosbottom.com) to see if I could share it with my readers. She happily agreed. When I asked how she developed this recipe she explained that she tasted something like this while in Paris and then set out to recreate it for her readers. I’ve adapted it and hope you love it as much as I do. Make sure you look for good quality dark chocolate. If you can find hand made caramels the cake will be that much better. And remember this cake is great for any happy occasion!

Dark Chocolate and Caramel Cake

Serves 8

7 ounces unsalted butter, at room temperature

½ pound bittersweet chocolate chips or bars, cut into small pieces (I like Ghiradelli 60%)

4 large eggs

½ cup fine sugar

¾ cup sifted flour

1/2 teaspoon baking powder

½ teaspoon Fleur de Sel or sea salt

8 caramels, like Kraft’s, cut in half

Powdered sugar

1 quart best quality vanilla ice cream

  1. Preheat the oven to 350F.Butter and flour an 8-inch springform pan. Line the bottom with a round of parchment paper.
  1. In a Pyrex measuring cup or other glass bowl combine the butter and chocolate and cook until the chocolate and butter are melted; about a minute and a half. Check after 30 seconds and using a rubber spatula blend together. Remove and cool.
  1. Meanwhile combine the eggs and sugar in an electric mixer and on medium-high speed mix for about 3 minutes, or until the mixture lightens in color and thickens slightly. Reduce the speed to medium and add the chocolate-butter mixture. Then add the flour, baking powder and salt and carefully incorporate until blended. Transfer the mixture into the prepared springform pan. Use a rubber spatula to even out the top.
  1. Push the caramel pieces into the batter carefully so they are equally placed. Use the spatula to smooth the top. Bake for 22 to 28 minutes or until a wooden skewer comes out clean from the center. Cool the cake on a cooking wire rack for at least 20 minutes. Run knife around the inside edge to avoid sticking. Once cool release the sides.
  1. To serve: Using a sharp knife remove the bottom springform from the cake and discard the parchment paper. Transfer onto a serving platter, decorate with powdered sugar, slice into wedges and serve with a scoop of vanilla ice cream, if desired.

Advance Preparation: This can be made through step 4, cooled completely and covered with plastic wrap and then foil and refrigerated up to 2 days ahead. It can also be frozen and defrosted. To reheat, remove foil and plastic wrap and bring cake to room temperature. Reheat in a 350F oven for 10 minutes.