Paris Perfect Fig and Goat Cheese Salad


IMG_5132.JPG

I was craving a trip to Paris. After all it had been a couple of decades since we had lived there and wanted to return to reminisce and celebrate a birthday. Why not recreate our past by finding an apartment so I could cook when I felt the urge? As a chef, visiting the open-air markets is an invitation to prepare a meal that is local, seasonal and French. As I trolled the web for apartments I came across Paris Perfect, an apartment rental agency that also has a concierge for restaurants and outings, special culinary experiences and much more. I was in! https://www.parisperfect.com

I selected an apartment in the center of Paris that had been remodeled with… get this… a washer/dryer, dishwasher and air conditioning. It was beautifully furnished and even had 2 TV’s so no arguing with my husband about which French station we wanted to watch. Our location was right in the center of Paris adjacent to Pont Neuf. Every day was an adventure with visits to museums, concerts and historical monuments. Sure, I loved those outings- but going to the farmers market was truly thrilling for me. My mind was racing as I eyed the oysters, cuts of lamb and beef, rotisserie chickens juices dripping into the roasted potatoes, orange and yellow cheeses galore, a grand selection of baked goods and a kaleidoscope of colorful, aromatic and seasonal fruits and vegetables. One day we made a lunch of pates, fresh salads, cheese and a crispy baguette. So fun and memorable.


As the days ticked by we decided to have Paris Perfect’s chef Brian Defer cook us dinner in our small but well-equipped kitchen. Starting with champagne we enjoyed a dinner of this Roasted Fig Salad with Goat Cheese. The entrée was stuffed sole with leeks and creamy potato gratin Dauphinoise, followed by end of the summer peach charlotte. Chef Defer just released his first cookbook, Les Marches Francais featuring seasonal Paris market cooking and is available on Amazon.


I couldn’t get this salad out of my mind—Fresh figs are seasonal and will soon be out of season so I urge you to try this colorful and autumnal salad while figs are still available. Any fresh variety will work in this salad. I’ve now made it a few times with some adaptations. Here’s the thing, it is very versatile. Try it as a first course or as an after the main course salad. Either way it is winner.


Paris Perfect Fig and Goat Cheese Salad

Serves 4


Roasted Garlic Shallot Vinaigrette

3 medium shallots, peeled

6 garlic cloves, ends removed

1 tablespoon olive oil

Salt and freshly ground black pepper

3 tablespoons sherry vinegar

1 teaspoon Dijon Mustard

1 ½ teaspoons honey

1/2 cup olive oil


8 large fresh figs, rinsed and stems removed

8 heaping teaspoons fresh goat cheese

1 tablespoon olive oil

Thyme leaves

3/4 pound arugula greens

1/4 cup toasted pine nuts or Marcona almonds


  1. Preheat the oven to 375° Place the shallots and garlic on a baking sheet. Coat with the olive oil and season with salt and pepper. Roast them, turning them midway, for about 45 minutes, or until browned and lightly caramelized. Cool.


  1. In a small food processor combine the shallots and garlic and puree. Add the vinegar, mustard and the olive oil and blend until the dressing is emulsified. Add salt and pepper and season to taste. Before serving, stir the dressing thoroughly.


  1. Decrease the oven temperature to 350F. Place the figs on a foil-lined baking sheet. With a small paring knife, cut each fig ¾ of the way down making sure to keep the fig intact. Move the fig a quarter turn and make another cut so that the fig opens like a flower. Arrange each teaspoon of goat cheese in the center of each fig. Drizzle the tablespoon of olive oil equally over the figs and place a few thyme leaves on top. Roast for about 12 minutes or until cheese is soft and beginning to melt.


  1. While the figs are roasting combine the arugula, and pine nuts or almonds in a large salad bowl. To serve, pour enough dressing over the salad to moisten and mix to combine. Place on serving plates, arrange the warm figs on top and serve immediately.


Advance Preparation: The vinaigrette may be prepared up to 2 weeks ahead, covered and refrigerated. Bring to room temperature and whisk before using. The salad can be prepared up to 2 hours ahead, covered and refrigerated. Make the figs up 6 hours ahead, lightly cover and leave at room temperature until roasting.
 

Glazed Blood Orange Yogurt Loaf Cake


GLAZED BLOOD ORANGE YOGURT LOAF CAKE.jpg


Author Jamie Schler has a sure-fire hit with her new cookbook devoted entirely to oranges, Orange Appeal: Savory and Sweet. Her love of oranges started as a child when she lived in Florida and has only grown larger as an adult. I’m not big on one-subject cookbooks; this book made me think twice about that. She’s developed a stunning collection of recipes that make you want to run out to the market and stock up on oranges.

Her love of the orange is reflected in dishes from main courses to dessert. Many of the recipes show off the oranges’ diversity like Orange Fig Sauce, Orange Braised Belgian Endive with Caramelized Onions and Bacon, Beef in Bourbon Sauce, Glazed Apple and Orange Braid, and Chocolate Orange Marmalade Brownies. The photos are beautifully shot and you’ll find many tips and hints to guide you along the way. Schler is an accomplished teacher and hotel owner. Together with her husband Jean-Pierre Dagneaux, she runs the Hotel Diderot in Chinon, France, an ancient city in the beautiful Loire Valley. Her three-star property offers not only first-rate accommodations but also award-winning cuisine. Clearly, Jamie never sleeps because she also makes and sells an amazing line of jams.

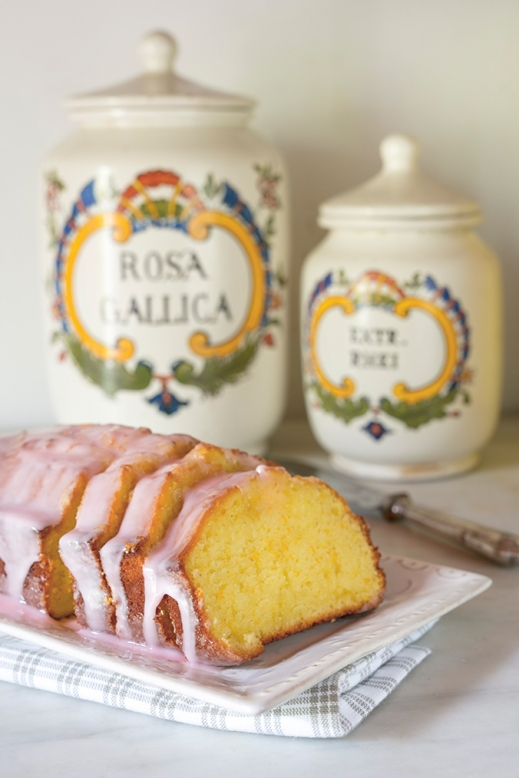
This Glazed Blood Orange Cake turned out to be the perfect recipe to test. I didn’t have blood oranges available so I used navel oranges instead. I imagine with blood oranges, the cake might have had a more complex sweet-slightly bitter flavor. Author Schler explains “Thanks to the yogurt and the vegetable oil, this spectacular, intensely orange loaf cake stays moist for several days”. This recipe is Seriously Simple to prepare in the food processor.

Once the cake comes out of the oven you may find the top is high. When I let it cool, I reversed it on a cooking rack and the top flattened out beautifully. Make sure to poke lots of hole in the warm cake and then spoon over the orange syrup to evenly moisten the cakes interior. The author says the glaze is optional so try it either way. This cake is the definition of versatile I’m serving it for Halloween night this year. You can also serve it with coffee or tea for breakfast, as an afternoon snack or at teatime and as dessert for lunch or dinner. I can’t wait to try it with blood oranges.


Blood Orange Yogurt Loaf Cake

Makes 1 (9-inch/ 23 cm) loaf cake

1 1/2 cups (7 ounces / 195 grams) flour

2 teaspoons baking powder

1/4 teaspoon salt

1 cup (250 ml) unsweetened plain whole milk or Greek yogurt

1 cup (200 grams) granulated white sugar

3 large eggs

Zest of 3 blood oranges

1/2 teaspoon vanilla extract

1/2 cup (125 ml) vegetable oil

Blood Orange Syrup

1/3 cup (85 ml) blood orange juice

1 tablespoon granulated white sugar

Glaze

2 tablespoons blood orange juice

1 cup (135 grams) confectioner’s sugar

Loaf Cake

  1. Preheat the oven to 350 degree F (180 degrees C). Butter a standard 9 x 5 x 2 1/2-inch (22 x 13 x 6 ½ cm) or 8-cup (2 1) loaf pan, line the bottom with parchment paper and flour the sides of the pan.
  2. Sift or whisk together the flour, baking powder, and salt and set aside.
  3. In a large mixing bowl, whisk together the yogurt, sugar, eggs, zests, and vanilla until blended and smooth. Slowly whisk the dry ingredients into the wet ingredients just until combined and smooth. Fold the oil into the batter, a little at a time, until well blended and no oil has collected around the edges of the batter.
  4. Pour the batter into the prepared loaf pan and bake in the preheated oven for 45–50 minutes or until the center of the cake is moist but set and a tester inserted into the cake comes out clean.
  5. Prepare the orange syrup by placing the orange juice and sugar in a small saucepan over low heat. Cook until warm and the sugar is completely dissolved and the liquid is clear. Set aside to cool slightly.
  6. When the cake is done, remove from the oven onto a cooling rack that has been placed on top of a large foil-lined baking sheet and allow to cool for 10 minutes. Carefully loosen the cake from the pan by running a knife around the edges between cake and pan. Turn the cake out of the pan, discard the parchment paper, and then place the cake upright on the cooling rack. While the cake is still warm, pour and brush the warm syrup all over the top, allowing it to seep into and soak the loaf and to run down the sides. Allow to cool completely. ( At this point you can serve the cake; the glaze is optional.)
  7. Prepare the glaze by stirring the orange juice into the sugar until the sugar ha dissolved and the glaze is smooth. The glaze should be thin enough to spoon or drizzle over the cake but just stiff enough that some of the glaze will cling to the sides.
  8. Gently lift the cake off of the rack and onto a serving platter.


Ice Cream Pies: No-Fail Summer Desserts


CDE0277A-60E3-4BAD-9B54-05EEAA8DD709.jpg            Desserts can be tricky for a Seriously Simple cook, especially as the temperature goes up. Making pie dough or baking a fancy cake isn’t what I have in mind in the heat of the season. Ice cream pie answers the call for a decadent, delicious and very easy to-put-together dessert. Here are two of my favorite ice cream pies, perfect for entertaining since they are need to be made ahead and are easy to assemble:

The first, my 5-minute icy confection says it all… five minutes for a wow-factor sweet. Since you are buying the crust, insert the pre-made crust into a pretty pie plate, either simple glass or porcelain for a pretty presentation. Softened ice cream is spooned into the crust and frozen. Then a simple decoration can be added like nuts, drizzled syrup or grated chocolate. A warm berry compote is spooned over the pie slice just before serving. For a Fourth of July theme, use strawberry and vanilla ice cream, no chocolate syrup, and use all blueberries for the sauce (6 6-ounce containers); garnish with strawberries and whipped cream—Red, white and blue— It’s a knockout summer dessert.

In the spirit of America’s favorite dessert, this Banana Split Ice Cream Torte requires a little more work since you put the cookie crust together but is fun to be create your own flavor palate. The ice cream varieties have exploded so look for your favorite combinations to build this torte. If you want to make it Fourth of July festive, arrange raspberries and blueberries (that can be frozen) on the outside border. I also look for little American Flags to decorate the top of the pies.


Make sure the ice cream is soft enough to work with for both pies but is not already melting; remove the ice cream from freezer for 20 minutes before working with it. Either of these is easy to make and can involve children as well. Kids can help decorate the finished frozen dessert. This is a great item to keep in your freezer. Remember to remove the pie from the freezer 15 minutes before serving for easy slicing. Enjoy.

Five-Minute Ice Cream Sundae Pie with Berry Sauce

Serves 6 to 8


1 quart (or 2 different flavored pints) favorite ice cream, slightly softened,

1 (9-inch) purchased graham cracker piecrust or chocolate-cookie piecrust

1/3 cup purchased chocolate syrup (in squirt bottle)

2 tablespoons toasted almonds, sliced or chopped

2 (6-ounce) containers blueberries

2 (6-ounce) containers raspberries

2 (6-ounce) containers blackberries

2 tablespoons water

2 tablespoons brown sugar

  1. Spoon ice cream into crust (if doing two different ice creams, spread one on top of the other); smooth top.
  2. Squeeze chocolate sauce in straight lines over pie, spacing 1/2 inch apart. Draw tip of knife through chocolate lines, forming pretty pattern.
  3. Sprinkle with almonds; freeze until firm.
  4. Just before serving, bring all berries, 2 tablespoons water, and brown sugar to simmer in medium saucepan over medium-high heat. Cook until sauce thickens, stirring gently, about 4 minutes; remove from heat. Cut pie into wedges; place on plates. Spoon warm sauce over and serve immediately

The pie may be prepared up to 2 weeks ahead, covered tightly, and frozen.


Banana Split Ice Cream Torte

Serves 6 to 8

Crust

6 tablespoons sliced blanched almonds

40 chocolate wafers (One 9-ounce box)

5 tablespoons unsalted butter, melted

Filling

3 bananas, peeled and cut into 1/4-inch slices

1 quart French vanilla ice cream, softened

6 ounces bittersweet chocolate, finely chopped

Garnish

2 ounces bittersweet chocolate, grated

  1. Preheat the oven to 350° Toast the almonds on a baking sheet for 7 to 10 minutes or until lightly browned. Reserve 2 tablespoons of the almonds for the garnish.
  2. For the crust, process the remaining 1/4 cup of the almonds in a food processor for 10 seconds. Add the cookies and process until they resemble crumbs. Transfer the crumbled cookies and nuts to a medium mixing bowl and add the butter, mixing with your fingers until completely combined. Butter the bottom and sides of a 9 1/2-inch springform pan. Pat the crumb mixture on the bottom and halfway up the sides. (Don’t worry if it’s not perfectly even.) Refrigerate for at least 4 hours or freeze for 1 hour.
  3. For the filling, puree 2 bananas in a food processor fitted with the metal blade. Add the ice cream and process until well blended. With a few pulses, blend in the chocolate and then the remaining sliced banana, being sure not to break it up too much.
  4. Pour the filling into the crust in the pan in an even layer, smoothing it down. Cover it with wax paper and place it on a baking sheet to keep it level. Freeze for 1 hour. When the ice cream is set but not completely frozen, garnish the top with toasted almonds and the grated chocolate in an even layer. Freeze the torte for at least 12 hours, then cover it with plastic wrap. Remove the torte from the freezer 15 minutes before serving, place it on a serving platter, and release the sides of the pan. Use a serrated knife to cut the pie in slices.

May be prepared up to 1 month ahead, covered tightly, and frozen.

Bread and butter? Versatile Olive Oil Dips Take the Place of Butter

_MG_0540.jpg


We’ve come a long way from simple packaged breads that you can pick up at the supermarket. Here in Los Angeles bread bakeries are springing up across the city. My favorites are The Bread Lounge and Clark Street Bakery at the moment, each with their own spin on crusty, chewy baguettes as well as many other varieties. These toothsome loaves need a fresh accompaniment idea.

Bread and butter? Not so fast. Creative olive oil combinations have taken the place of butter as an accompaniment for bread. I prefer the fruity flavor of olive oil with bread. Even more delicious are blending different flavors together. These sauces become the center of the table and are a wonderful beginning to any Mediterranean-inspired repast. A glass of chilled Rose or Chardonnay would be a refreshing pairing.

As the weather heats up, you’ll appreciate how easy these are to prepare— no cooking required. I like to serve these sauces in small glass bowls with a spoon for people to help themselves. Make sure to have an assorted bread basket with French baguette, walnut, sourdough and Foccacia along with bread plates.

These versatile sauces are also a wonderful glaze on grilled chicken, fish or vegetables,. They can also be used as a simple sauce to pasta and a quick dressing to drizzle on your favorite greens. Look for Meyer lemon-flavored olive oil— it offers a slightly sweet yet tart flavor to the oil. If you can’t find it, add a bit of lemon juice and zest to the oil and go from there. Make sure to select a good quality robust extra virgin olive oil.

Olive Oil Dipping Sauces

Serves 4 to 6

Lemon, Olive and Dried Cherry Sauce

1/2 cup lemon olive oil

2 tablespoons good quality balsamic vinegar

2 garlic cloves, ends removes and sliced into very thin slivers

A few sprigs of fresh thyme leaves

2 tablespoons chopped kalamata olives

2 tablespoons chopped dried cherries

Freshly ground black pepper


  1. Combine all of the ingredients in small glass bowl and mix to combine. Cover and let rest for at least 4 hours so that the flavors have time to meld. Serve with a spoon or pour into small plates for serving with bread.


Advance Preparation: This can be made up to 1 week ahead and covered in an airtight container and kept at room temperature


Anchovy, Sun-Dried Tomato and Tapenade Sauce

1/2 cup fruity olive oil

2 tablespoons good quality balsamic vinegar

2 tablespoons chopped anchovies, (I prefer white anchovies if you can find them)

2 tablespoons green or black storebought Tapendade

2 tablespoons chopped oil-packed sun-dried tomatoes

1/4 1/teaspoon hot sauce or spicy chile paste, or to taste


  1. Combine all of the ingredients in small glass bowl and mix to combine. Cover and let rest for at least 4 hours so that the flavors have time to meld. Serve with a spoon or pour into small plates for serving with bread.


Advance Preparation: This can be made up to 1 week ahead and covered in an airtight container and refrigerated. Return to room temperature before serving.


Note: You can find white anchovies at gourmet specialty stores in the refrigerated section. They have a sweeter, milder flavor than regular canned anchovies.


Caramel Chocolate Matzo Brittle: A Serious Hit on the Passover Dessert Table

IMG_1539.JPG


Desserts are a challenge during the Passover holiday. Why? Wheat flour isn’t permitted and also most guests don’t have room for a big dessert. I have made flourless chocolate tortes, meringues topped with lemon curd and almond olive oil cakes that sit idle at the table. This is a serious hit on my Passover table year in and year out. I like to make this up ahead and keep refrigerated until serving. You can even freeze it if you have any left over. When I came across the recipe idea many years ago I thought this is the perfect way to enjoy a sweet without it being too heavy. I break the matzo apart into shards or use a serrated knife to cut into pieces so that everyone can have as much as they want or just a taste. I like to accompany this with a bowl of beautiful fresh strawberries that celebrate the spring season. I find that having the ingredients organized in small bowls is a big help in putting these sweet gems together. I use an offset metal spatula to help spread the caramel and chocolate quickly. Another Seriously Simple tip is to use disposable aluminum baking sheets for easy clean up. You can double this recipe but you will have to make the caramel in two different batches. I have also given this as a gift when I am going to someone’s home for Passover. Look for food safe clear cellophane and wrap it with a pretty ribbon.


Makes 4 sheets


6 tablespoons unsalted butter or margarine

1/2 cup dark brown sugar

4 sheets matzo

3/4 cup bittersweet chocolate chips

1/3 cup toasted almonds

1/3 cup toffee bits


  1. Set the oven at 400 degrees. Line 2 baking sheets with foil or parchment paper. (I prefer to use 2 disposable baking sheets and place on top of the cookie sheets since it is so messy). Place two matzos on each baking sheet.
  2. In a medium saucepan over medium heat, melt the butter or margarine. Add the sugar and stir well. (If the heat is too high the mixture will burn.) Simmer for about 3 minutes, making sure to whisk constantly so the mixture blends well, or until it becomes a thick caramel-like mixture. Remove from the burner.
  3. Working quickly so that the caramel doesn’t harden, divide the caramel mixture among the sheets of matzo using a metal spatula to evenly spread the mixture over the entire surface of each matzo.
  4. Return to the oven and bake the matzos for about 5 minutes or until the topping is bubbly and brown. Watch carefully so they don’t burn.
  5. Remove the sheets from the oven and immediately sprinkle each evenly the chocolate chips. Place the matzo back in the oven for about 2 more minutes or until the chocolate is just melted. Remove from the oven and spread the chocolate evenly over each piece with a spatula. Sprinkle evenly with the almonds and toffee bits.
  6. Place in the refrigerator for at least an hour. Break into pieces or cut into strips and arrange on a serving platter. This can be stored in an airtight container and refrigerated. It can also be frozen.

Caramelized Banana Foster Bread: Coffee Cake or Dessert

bananas-foster-banana-bread-main

When the book Foster’s Market Favorites landed on my desk I was in heaven. Exquisite photography coupled with time-tested comfort dishes are highlighted from her amazing market in Chapel Hill, North Carolina. The introduction written by her husband tells her story— from her roots in Tennessee to finally settling in North Carolina where she and her market have become a culinary institution.


This book is a collection of Sara Foster’s recipes from areas of her past—Chicken Salad from Soho Charcuterie, NYC, Says Bread Pudding from her early Market days and a plethora of Southern dishes like Pecan Sweet Potato Sticky Buns and Foster’s Pimento Cheese. I couldn’t get enough of the photos which truly made me hungry when I had just finished lunch! Kudos to photographer Peter Frank Edwards.


I settled on testing this recipe after looking at the picture. One word for you—YUM! Easy to put together, this recipe has made it into my Seriously Simple fallback recipe file. I did a bit of tweaking the recipe by slicing the banana that is caramelized rather than keeping it halved. I also used rum instead of bourbon to switch it up. It was hard to let the bread cool because I wanted to dive into it as it sat on a rack resting. I served it for dessert with vanilla ice cream to raves at a casual dinner party and the next day as a coffee cake. Either way, this clever take on Bananas Foster from New Orleans will leave your guests asking for more.


Foster’s Caramelized Banana Foster Bread


½ cup light brown sugar

5 ripe bananas

2 tablespoons bourbon or rum

2 ¼ cups all-purpose flour

2 teaspoons baking powder

1 teaspoon ground cinnamon

½ teaspoon freshly grated nutmeg

½ teaspoon ground cardamom

¼ teaspoon salt

8 tablespoons (1 stick) unsalted butter, softened

1 cup sugar

2 large eggs

½ cup chopped pecans

1 teaspoon pure vanilla extract


1.Preheat the oven to 350°F. Grease and lightly flour a 9 x 5 x 3-inch loaf pan.


2.Spread the brown sugar evenly on the bottom of a cast -iron skillet over medium heat. Peel and slice 1 of the bananas into ½-inch slices and place on the sugar. Sprinkle the bourbon (or rum) over the top and cook, shaking the pan occasionally until the sugar melts and the banana begins to caramelize, about 3 minutes. Turn the slices over and continue cooking and caramelizing, about 2 to 3 more minutes, or until all slices are nicely caramelized. Remove from the heat and set aside until ready to use.


3.Combine the flour, baking powder, cinnamon, nutmeg, cardamom and salt in a large bowl and stir to mix.


4.In a separate bowl, with an electric mixer beat together the butter and sugar until soft and creamy, stopping to scrape down the sides of the bowl several times. Slowly add the eggs, one at a time, mixing well after each addition. Slice and add the remaining 4 bananas, pecans and vanilla, mixing to break up the bananas and combine.


5.By hand, stir the flour mixture into the banana mixture just until the dry ingredients are incorporated, being careful not to overmix. Pour the batter into the prepared pan and place on a rimmed baking sheet (this makes it easier to handle in and out of the oven).


6.Arrangethe caramelized banana slices evenly on top of the loaf and drizzle with any remaining caramel. Bake 1 hour to 1 hour and 10 minutes, until the bread rises and a wooden skewer comes out clean when inserted in the center.


7.Remove from the oven and let sit to cool, about 15 minutes. Run a knife around the inside edge of the pan, turn the loaf out onto a cooling rack and continue to cool more before slicing and serving, about 10 minutes.


bananas-foster-banana-bread-main.jpg


Burrata with Minted Peas, Proscuitto and Hazelnuts: A Springtime Delight

IMG_1574

This is one of my favorite dishes to serve as an appetizer or a main course for lunch. Little cooking is required and it is fun to put it all together. When spring comes into full bloom I can’t wait to cook with fresh peas. Look for fresh peas at your local farmer’s market and use them quickly so the peas retain their sweet flavor. Feel free to open up a pea pod and taste the peas to make sure they are sweet and aren’t starchy or bitter. Some farmers markets offer peas freshly shucked if you are in a hurry.


Burrata was invented as a way to use leftover curds after making mozzarella. The mozzarella is formed into a pouch and filled with these creamy curds. This is so delicious but a little goes a long way because it is so rich and creamy. Don’t worry if the burrata doesn’t slice evenly because the interior is very creamy.


This recipe combines a simple meat and cheese pairing with spring ingredients that are added as a seasonal addition. You can find burrata and packages of sliced proscuitto at specialty shops and some supermarkets. The burrata is worth hunting for but if not available try a good quality fresh mozzarella. I like to finish this dish with a drizzle of olive oil and a sprinkling of toasted hazelnuts. The nuts add a toasty flavor and coarse texture against the creamy burrata. To drink? I like a California chardonnay or a full-bodied rose. Don’t forget to serve this with some crusty French bread.


Burrata with Minted Peas, Proscuitto and Hazelnuts


Serves 4


1 1⁄4 cups fresh peas ( about 1 pound fresh pea pods)

1/3 cup medium-size mint leaves, finely chopped

2 tablespoons fresh lemon juice

4 tablespoons extra-virgin olive oil

Salt and freshly ground black pepper

4 ounces thinly sliced proscuitto

1 pound fresh burrata, cut into 16 slices

2 tablespoons finely chopped toasted hazelnuts


  1. Bring a medium saucepan of water to a boil over medium-high heat; add the peas and cook for 2 minutes. Drain and cool under cold running water. Cool and reserve.


  1. In a medium bowl, combine the peas, mint, lemon juice, 3 tablespoons of the olive oil, and salt and pepper to taste. Mix gently until thoroughly combined.


  1. Arrange proscuito slices folded over on a large round or rectangular serving dish. Arrange overlapping slices of burrata on top of the proscuitto in the center.


  1. Spoon the pea and mint mixture onto the burrata, allowing a bit to fall onto the proscuitto. Drizzle the remaining1 tablespoon of olive oil evenly over the top. Sprinkle the hazelnuts evenly on top and season with freshly ground pepper. Serve immediately.

Cauliflower Steaks with Romesco Sauce

Cauliflower SteaksWhen Cara Mangini’s The Vegetable Butcher landed on my desk I wondered how she would write a whole book on butchering vegetables. I had only seen the term “vegetable butcher” when I visited Eataly in New York City. Boy, was I in for a delicious surprise. The author gives us all you might want to know about vegetables from selecting, prepping, chopping and of course cooking everything from artichokes to zucchini. This is my go-to vegetable reference book now.

Leafing through the beautiful pages I happened upon Cauliflower Steaks with Red Pepper Romesco Sauce and Crispy Breadcrumbs. I have been testing lots of cauliflower recipes and thought this looked like a must-try for me. These thick slabs of cauliflower, brushed with olive oil, roasted and browned, are topped with a vibrant red romesco sauce and a sprinkling of crisp breadcrumbs This would be a satisfying first or main course. The author suggests serving crisp Fingerling potatoes alongside, and some quickly steamed or sautéed kale, chard, spinach or arugula, to round out the plate.

This Catalonian-style romesco sauce—comprised of roasted red peppers, tomatoes, sherry vinegar, and a mix of almonds and hazelnuts can be made up to two days in advance and stored in a container in the fridge. If you are pressed for time, look for jarred roasted peppers and skip roasting and peeling them. The sauce will improve after all the ingredients have melded together. Any leftover sauce can be tossed with pasta, spooned over eggs, spread on toast, or drizzled on steamed or roasted veggies. You can also freeze it in ice trays for later use.

Cauliflower Steaks with Red Pepper Romesco Sauce and Crispy Breadcrumbs

Serves 4

1 large head or 2 small heads cauliflower

4 to 5 tablespoons extra-virgin olive oil

Coarse or flaked sea salt

Freshly ground black pepper

1 cup coarse fresh breadcrumbs

Red Pepper Romesco Sauce (recipe follows), for serving

  1. Preheat the oven to 450°F. Line a plate with paper towels.
  2. Cut the cauliflower into steaks: Cut off the stalk flush with the base of the crown. Stand the cauliflower upright and cut 1-inch thick slices, from the crown to the core end.
  3. Carefully transfer them to a rimmed baking sheet. Brush them evenly on both sides with 2 to 3 tablespoons of olive oil, and season generously all over with salt and pepper. Roast, turning halfway through cooking, until the steaks are browned on both sides and tender, 20 to 25 minutes.
  4. Meanwhile, heat 2 tablespoons of oil in a small skillet over medium heat. Add the breadcrumbs and cook, stirring often, until they become golden brown and toasted, about 6 minutes. Sprinkle them with salt and pepper to taste, transfer them to the lined plate to drain, and let them cool completely.
  5. Divide the steaks among plates and top each with a dollop of warm or room-temperature sauce and a sprinkle of toasted breadcrumbs. Serve immediately with extra romesco sauce for the table and the crispy potatoes, if you wish.

Notes:

  • A small head of cauliflower will yield 2 to 4 small steaks, so you’ll want to use 2 heads for 4 servings to guarantee each person gets a thick cut. A large head should give you 4 good-size steaks.
  • Use a wide spatula to carefully transfer the steaks to a baking sheet. Any pieces that do not hold together can be prepared the same way and served alongside the steaks.

Red Pepper Romesco Sauce

Makes 2 cups

2 medium red bell peppers

2 small to medium tomatoes (plum tomatoes are a good option), halved lengthwise

1 large garlic clove

1/4 cup toasted almonds

1/4 cup toasted hazelnuts

2 tablespoons sherry vinegar

1/8 teaspoon cayenne pepper

1/8 teaspoon smoked Spanish paprika

1 teaspoon fine sea salt

1/2 cup olive oil

  1. Preheat the oven to 450°F. Line a rimmed baking sheet with parchment paper.
  2. Place the peppers on their side on one end of the prepared baking sheet and the tomatoes, cut side down, on the other. Roast until the tomatoes are soft and the skin has just started to brown, about 15 minutes. Carefully remove the tomatoes from the baking sheet and transfer them to a plate to cool. Continue roasting the peppers until the skin blackens and blisters in places, 20 to 30 minutes more (35 to 45 minutes total). Transfer the peppers to a bowl, cover immediately with plastic wrap, and let cool.
  3. Meanwhile, pulse the garlic in a food processor until it is finely chopped. Add the almonds and hazelnuts and blend until they are finely chopped.
  4. Peel the cooled tomatoes using your fingers (and a paring knife if needed) to remove and discard the skins; place the tomatoes in the food processor.
  5. To peel the peppers, use your fingers to pull off the charred skin, then pull off the stem, cut open the peppers, and scrape out and discard the seeds. Transfer the flesh to the food processor.
  6. Add the sherry vinegar, cayenne, paprika, and salt. With the motor running, stream in the olive oil until the mixture is smooth. Heat the sauce or serve it at room temperature or cold, depending on the application. Thin it with water if you wish.

Cauliflower Steaks with Romesco Sauce

A Salute to Summer Pasta with Zucchini, Sweet Corn, and Basil

By

Diane Rossen Worthington

Zucchini Sweet Corn Penne

When this book came across my desk, my first thought was this was just another vegetable book with a clever title. How wrong I was. The Vegetable Butcher should be an essential part of your cookbook library. It is THE guide for selecting, preparing, slicing and dicing and of course cooking all things vegetable. You will find butchery essentials interspersed throughout the book. Dishes like corn fritters, celery root pot pie and eggplant steak with salsa verde will make you want to run to your local farmers market and start cooking.


This pasta is replete with summer’s bounty. Zucchini, corn, and basil naturally go together and prove that combining them together creates a fourth flavor. I’d keep this recipe on hand as the summer continues since you may have lots of these ingredients on hand. This bright summer pasta is flavored with fresh lemon juice and studded with pine nuts and mozzarella. Author Mangini rightly reminds us that salting the pasta water is imperative because it flavors the simple sauce. Enjoy this with a chilled Chardonnay or Sauvignon Blanc.


Tasty Tips

  • To shuck the corn, hold the husked corn on the vertical and slide the chef’s knife down the sides releasing the corn kernels. There are now corn tools that will strip the kernels right off the cob. You can find them at your local gourmet store.
  • Use a swivel peeler to grate the cheese into thin shards.
  • Toast the pine nuts by placing them in a nonstick skillet on medium heat and toss them until they turn light brown and smell fragran 3 to 4 minutes. Cool.
  • Chop the basil just before cooking so it stays green.
  • Look for fresh mozzarella.


Zucchini, Sweet Corn, and Basil Penne with Pine Nuts and Mozzarella


Serves 4 to 6

Fine sea salt

3/4 pound good-quality dried penne

2 tablespoons extra-virgin olive oil

1 small red or yellow onion, thinly sliced

2 large garlic cloves, minced

2 medium zucchini, cut into 1/4-inch by 3-inch sticks

Kernels from 2 ears fresh corn

¼ teaspoon crushed red pepper flakes

1 tablespoon unsalted butter

1 cup loosely packed fresh basil leaves, coarsely chopped

1/4 cup toasted pine nuts

2 ounces mozzarella cheese, torn into bite-size pieces

2 to 3 tablespoons freshly squeezed lemon juice

Freshly shaved Parmesan cheese, for garnish

Your best extra-virgin olive oil, for garnish

Lemon wedges, for serving (optional)


  1. Bring a large pot of water to a boil and salt it generously (add 1 tablespoon of salt for every 4 quarts). Cook the penne according to package instructions until just shy of aldente, about 10 minutes. Drain the pasta, reserving at least 2 cups pasta water for the sauce.
  2. Heat the oil in a large, deep skillet or Dutch oven over medium heat. Add the onion and cook, stirring occasionally, until it starts to brown lightly, about 5.minutes. Add the garlic and cook, stirring constantly, until it becomes fragrant, 30 seconds. Add the zucchini, turn the heat up to high, and cook, stirring occasionally, until the zucchini softens, 6 to 8 minutes. (You will need to add up to 1 cup of the reserved pasta water, a little at a time, as the zucchini cooks and becomes dry and sticks to the pan.)
  3. Adjust the heat to medium and add the corn, ½ teaspoon of salt, the red pepper flakes, and the butter. Cook, stirring occasionally, for 2 minutes more. Add the penne and ½ cup of the pasta water, and stir well to incorporate. Cook, stirring often, until the pasta is well coated and the sauce has thickened, about 2 minutes.
  4. Turn off the heat and add half of the basil, the pine nuts, and the mozzarella. Add the lemon juice to taste and stir well to incorporate it. Scoop the penne into individual shallow bowls, making sure to evenly distribute the zucchini and corn. Top with the remaining basil, a fresh shaving of Parmesan, and a drizzle of your best extra-virgin olive oil. Serve with lemon wedges if you wish.

Roast Loin of Pork with Mustard Crust Brings out “Wows” at The Table


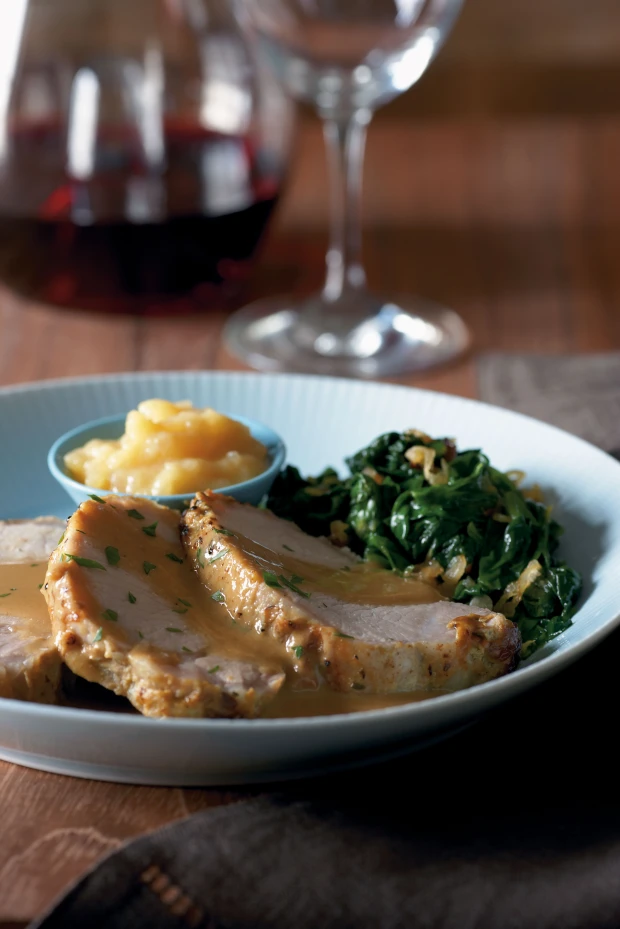
If you are tired of making the same holiday ham  I hope you’ll try this delectable recipe. When I developed this idea I thought about how good a mustard crust would be on a loin of pork. I was happily surprised at the resounding “wows” I received from the lucky tasters at my table.

Sounds complicated? In fact this recipe is so easy to make it might become a standard at your table during any of your holidays. The cognac sauce adds welcome flavor to the meat and the mustard applesauce is reminiscent of the classic pork chops and applesauce.

Remember that pork is 30% leaner than it was just a few decades ago so it will dry out if overcooked. In the past it was thought that pork had to be cooked until well done to avoid the risk of trichinosis. Make sure you cook the pork 5 to 10 degrees lower than you want it to be because it continues to cook as it rests. It’s okay if it is slightly pink inside.

Perfect for a dinner party, this moist pork roast is complemented by a savory Cognac and mustard sauce. Try serving this with braised spinach and rice pilaf. Or consider serving this with roasted Potatoes and Green Beans. For dessert, how about a chocolate pie?

To Drink? The two sauces are the keys here, so match the dish’s sweet and spice elements with a wine that delivers both. If white is your preference, select an off-dry Riesling from New York, Washington or Germany. For a red, a supple yet spicy flavored Australian Shiraz or Californian Zinfandel will be sublime.


Roast Loin of Pork with Mustard Crust


Serves 6 to 8


Mustard Apple Sauce

2 cups favorite apple sauce (Trader Joe’s Chunky-style is good)

2 teaspoons Dijon style mustard


Mustard Coating

1/2 cup Dijon mustard

2 tablespoons mustard seeds

1 teaspoon dried thyme

1 teaspoon favorite seasoning salt

Freshly ground black pepper

2 tablespoons olive oil


1 (3 1/2 pound) pork loin roast, tied


Cognac Sauce

1/2 cup cognac

1 cup chicken stock

3 tablespoons crème fraiche or heavy whipping cream

1 tablespoon Dijon mustard

Pinch coarsely ground white pepper


  1. To make the applesauce: combine the applesauce with the mustard in a small serving bowl and mix to combine. Cover and refrigerate until serving.


  1. Combine all of the mustard coating ingredients in a small bowl and mix to combine. Preheat the oven to 375F. Place the roast on a rack in a shallow roasting pan. Using plastic disposable gloves spread mustard coating evenly all over the roast.


  1. Roast the pork for about 1 1/4 to 1 1/2 hours or until a meat thermometer inserted into the center of the roast registers 140F. Remove from the oven and transfer the roast to a carving board. Cover with aluminum foil and let rest for at least 15 minutes. Place the roasting pan on the top of the stove.


  1. To make the Cognac sauce: Add the cognac and stock to the roasting pan, and increase the heat to high. Bring to boil, scraping up the brown bits. Boil until the alcohol has burned off and the liquid is slightly reduced, about 3 minutes. Whisk in cream and mustard and bring to boil. Cook until slightly thickened, about 2 minutes. Add pepper and whisk well. Taste and adjust the seasonings. Strain the sauce into a gravy boat of bowl.


  1. Remove the string from the pork and slice the pork. Arrange the slices on a platter and spoon over some of the Cognac sauce. Garnish with parsley. Serve with the remaining cognac sauce and the applesauce on the side.


Advance Preparation: The applesauce mixture and mustard paste may be prepared 1 day ahead, covered and refrigerated.


The Clever Cook Could:


  • Make this dish using pork tenderloins; figure 3 (1 1/4 pound) tenderloins and make sure not to let them touch when baking. Bake for about 25 to 35 minutes or until a meat thermometer inserted into the center of the roast registers 140F. Pork tenderloin is very tender and the sliced pieces will be smaller than the loin


  • Try the mustard crust on leg of lamb


53_CB_roastloin_006712.jpg